

MARCH 14, 2021
When building or performing maintenance on the engine in your hot rod, checking your engine’s bearing clearances is a great practice while you are “knuckles deep.” Not only is it advisable to check the visible condition of your main and rod bearings, but it is also a good practice to see how the tolerances are holding up.
The cost-effective option, primarily known by its product name, Plastigage, is constructed from a special extruded wax plastic with accurately controlled crush properties. This fine plastic thread precisely crushes to repeatable dimensions depending on the tolerances between the bearing and crankshaft.
Reasonably Priced Tool
For big horsepower applications, generally defined at 800-horsepower and above, working with your bottom-end bearing clearances suggests using highly accurate micrometers and dial bore gauges to ensure proper clearances. While these tools can be great for an engine builder, they are not typically considered “average” tools every enthusiast has in the arsenal.
MAHLE Aftermarket Incorporated recently took over the United States production of Plastigage, and Dan Begle from MAHLE provided his take on its practical applications with performance engines.
“In reference to your 800-horsepower fundamentals for Plastigage, that’s probably a good number,” says Begle. “I’m not sure if horsepower levels are a huge issue; it depends on the engine builder or machine shop you trust. If you talk to someone who builds a considerable number of performance engines, they’re probably using precision gauges.”

With our engine dismantled down to the short block, we are visually checking the condition of all rod bearings and main bearings for wear or damage. With no visible problems, we can comfortably use Plastigage to confirm our bearing clearances without the use of micrometers and dial bore gauges.
Begle continues, “If you’re looking at performing checks and balances on your engine, this is the ticket. It is not quite as accurate as a dial bore gauge, but if you’re conservative and not building something totally crazy, you’re probably good.”
For approximately ten-bucks, the home engine builder can utilize Plastigage to get the job done, especially when combined with a proper visual inspection of your bearing surfaces. Currently, I have the 489 big-block Chevy out of our bracket racing Camaro, and this is a prime opportunity to carefully check out the engine that came with our unfamiliar turn-key purchase a while back.
The Mahle/Clevite Performance Engine bearing catalog (Number EB4016) is easily viewable online. It contains a wealth of information concerning bearing clearances along with visual bearing inspection practices.
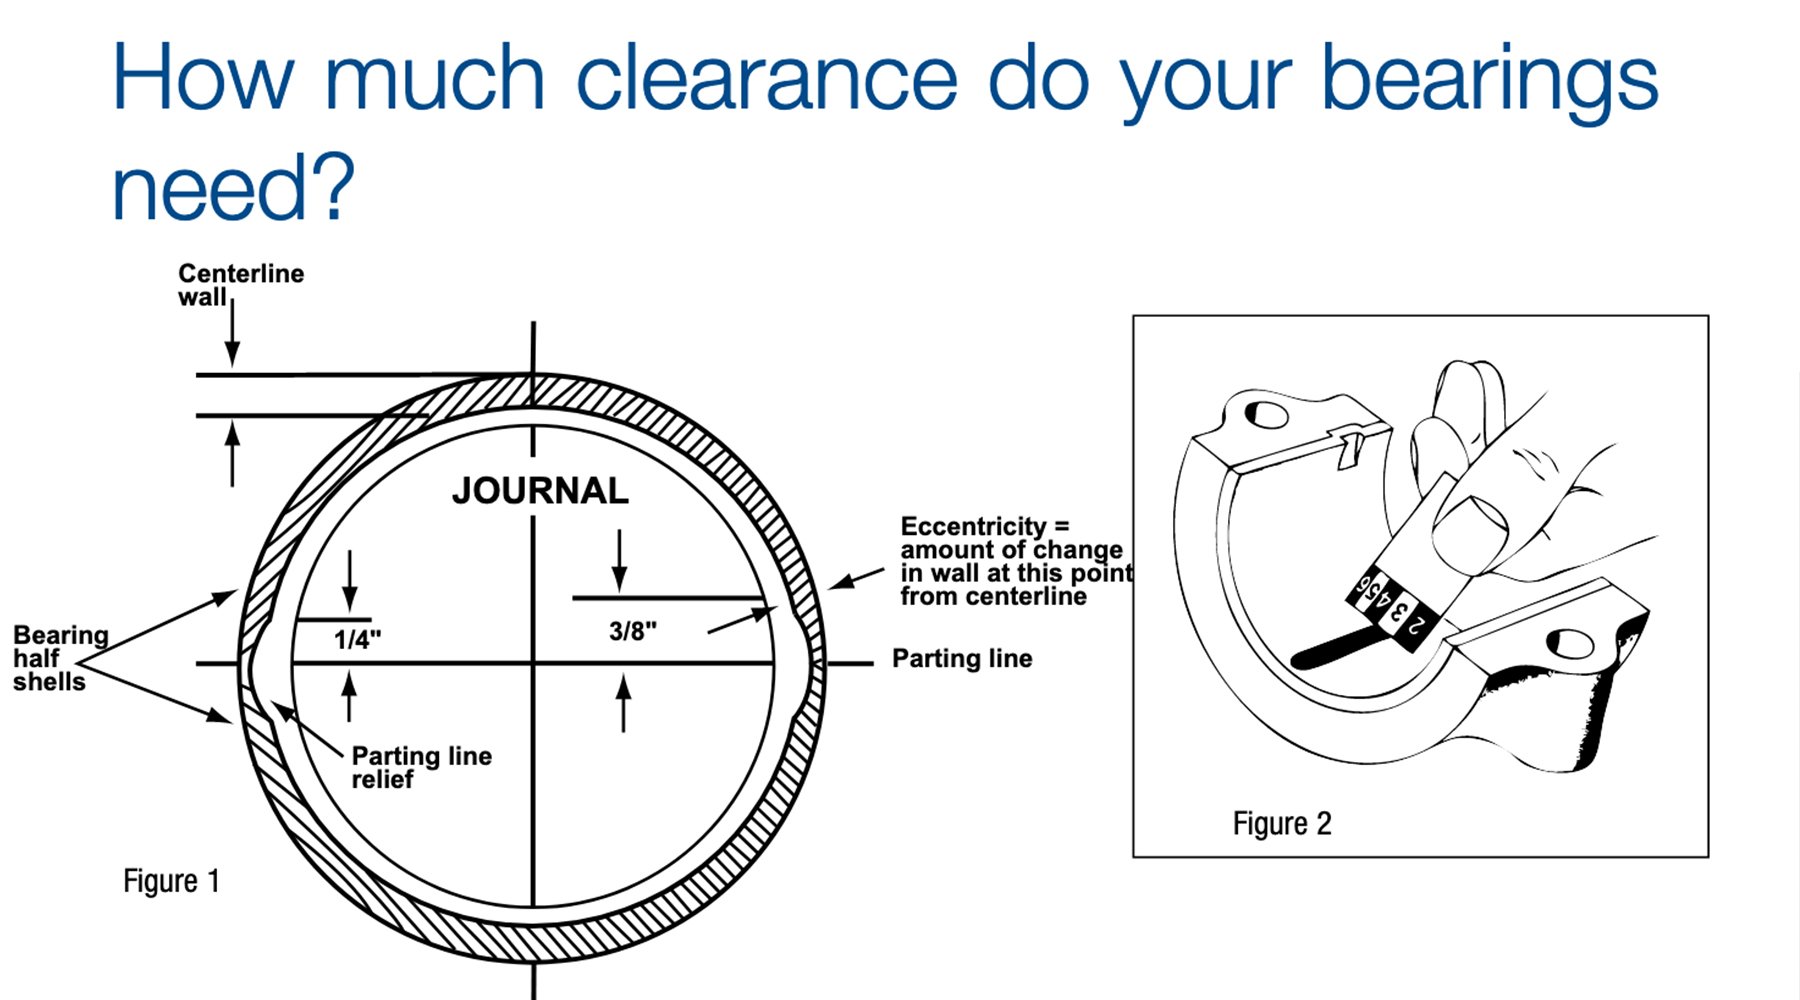
The typical rule of thumb for an OE or mild-performance application is .001-inch bearing clearance for every 1-inch of crankshaft or rod journal diameter. With a big block Chevy using a 2.75-inch main journal diameter, our tolerance is calculated to .0027-inch. A similar calculation for the rod journal indicates a necessary .002-inch clearance.
These tolerances can vary depending on engine design, horsepower levels, intended oil viscosity to be used, and many more variables. In fact, I called the original engine builder, who cited that a bracket racing engine like this is constructed at his shop with clearances slightly tighter than the previously mentioned standard. Make sure to do your research before scrutinizing your dimensions.
“I am also kind of old school on the .00075- to.001-inch of clearance per inch of journal rule, but you also need to consider the oil viscosity you are using,” comments Begle. “With a light viscosity and/or synthetic oil, I would certainly lean to the lower side of that clearance spectrum. In equal consideration, if you’re running a higher viscosity oil, definitely lean to the higher side of your clearances.”
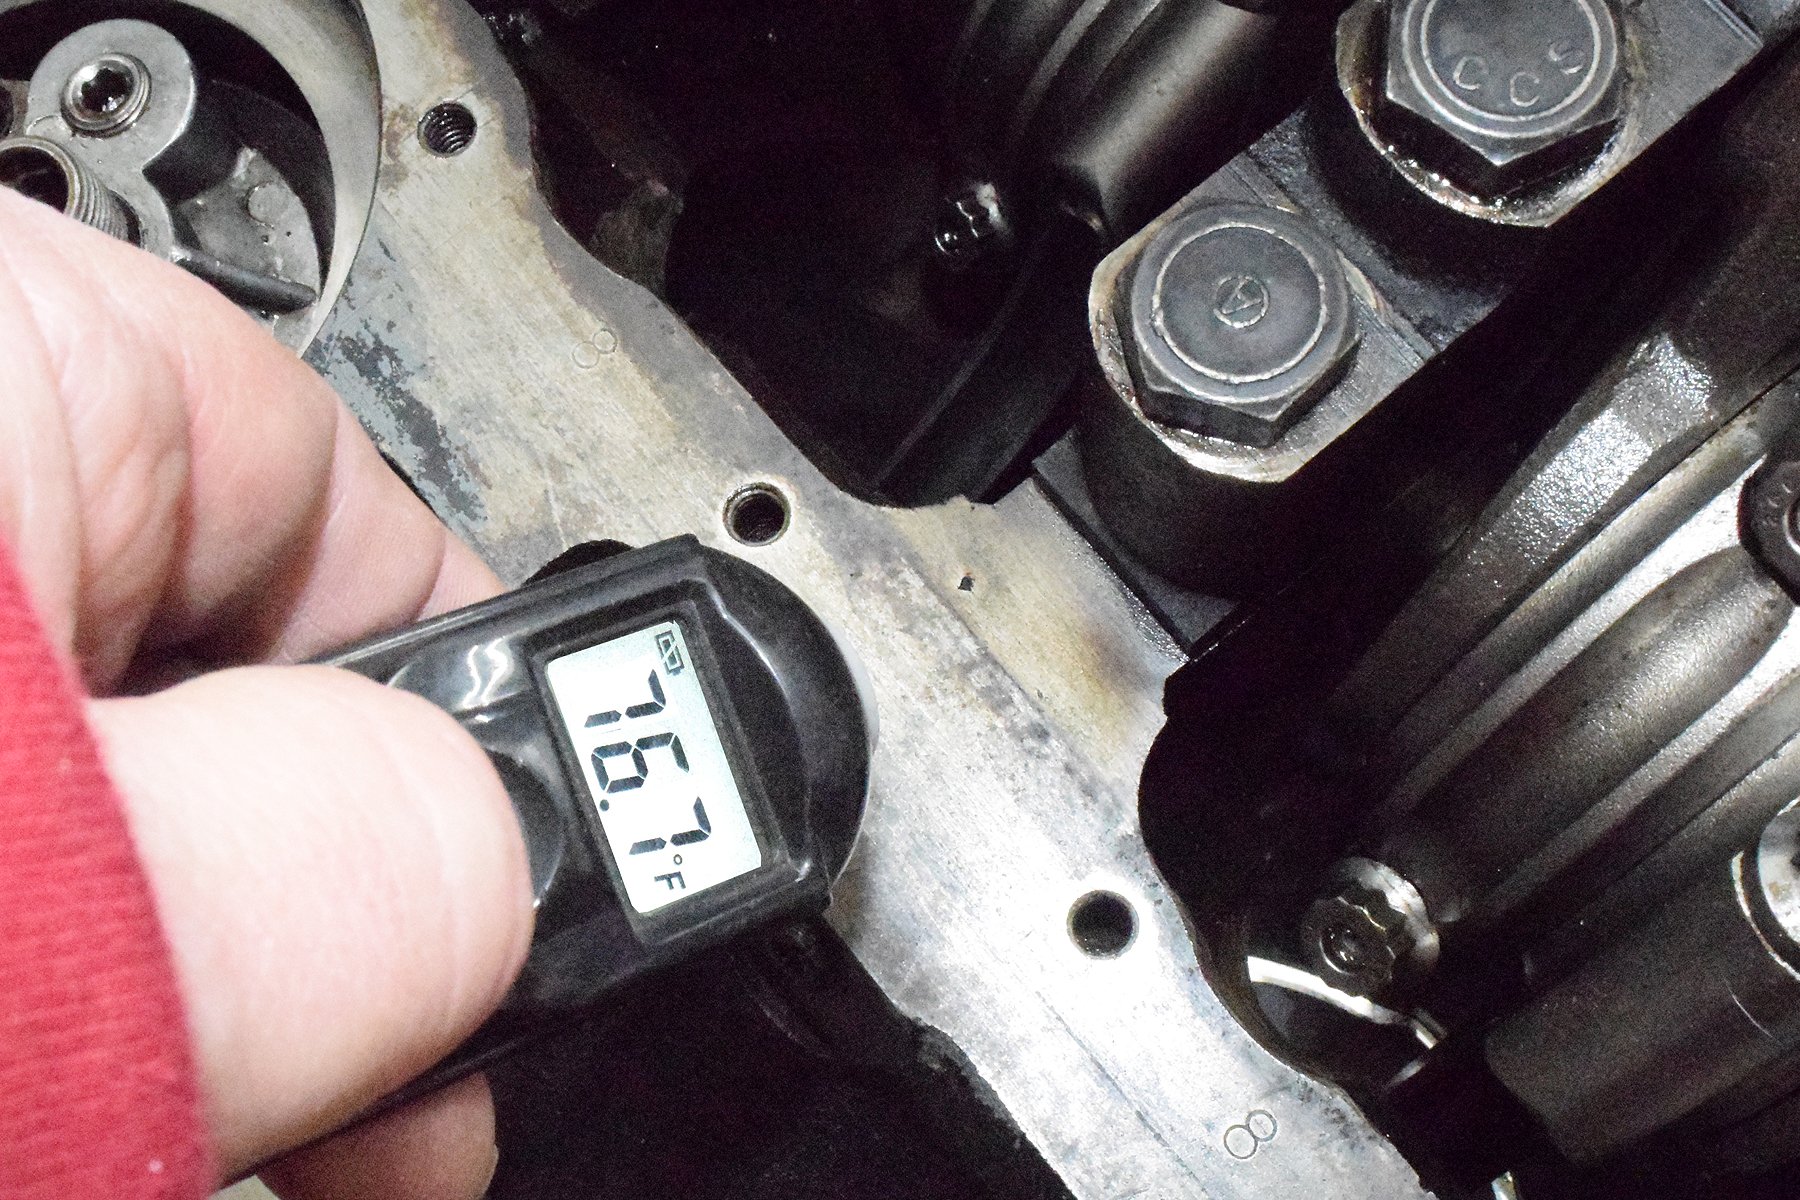
The first step in checking your engine’s bottom end is to carefully inspect all bearings for damage or uneven wear. Only then can you measure bearing tolerances. It is also critical to test with the Plastigage when the engine steel is at a minimum of 65 to 70 degrees for proper metal expansion. While extreme cold will make the Plastigage somewhat brittle and heat will soften the material, Plastigage remains usable and accurate through all normal variations of air temperature and humidity.
Each package of Plastigage comes with one 12-inch piece of color-matched, formulated plastic. These pieces are usually referred to as “threads” since they are equivalent in size to a piece of sewing thread in an uncompressed state. With a standard V8 engine, this will test all rod and main bearings with a little to spare. The extra is handy because, if you ever drop a small section of this thread, it is my experience that you will never find it again.
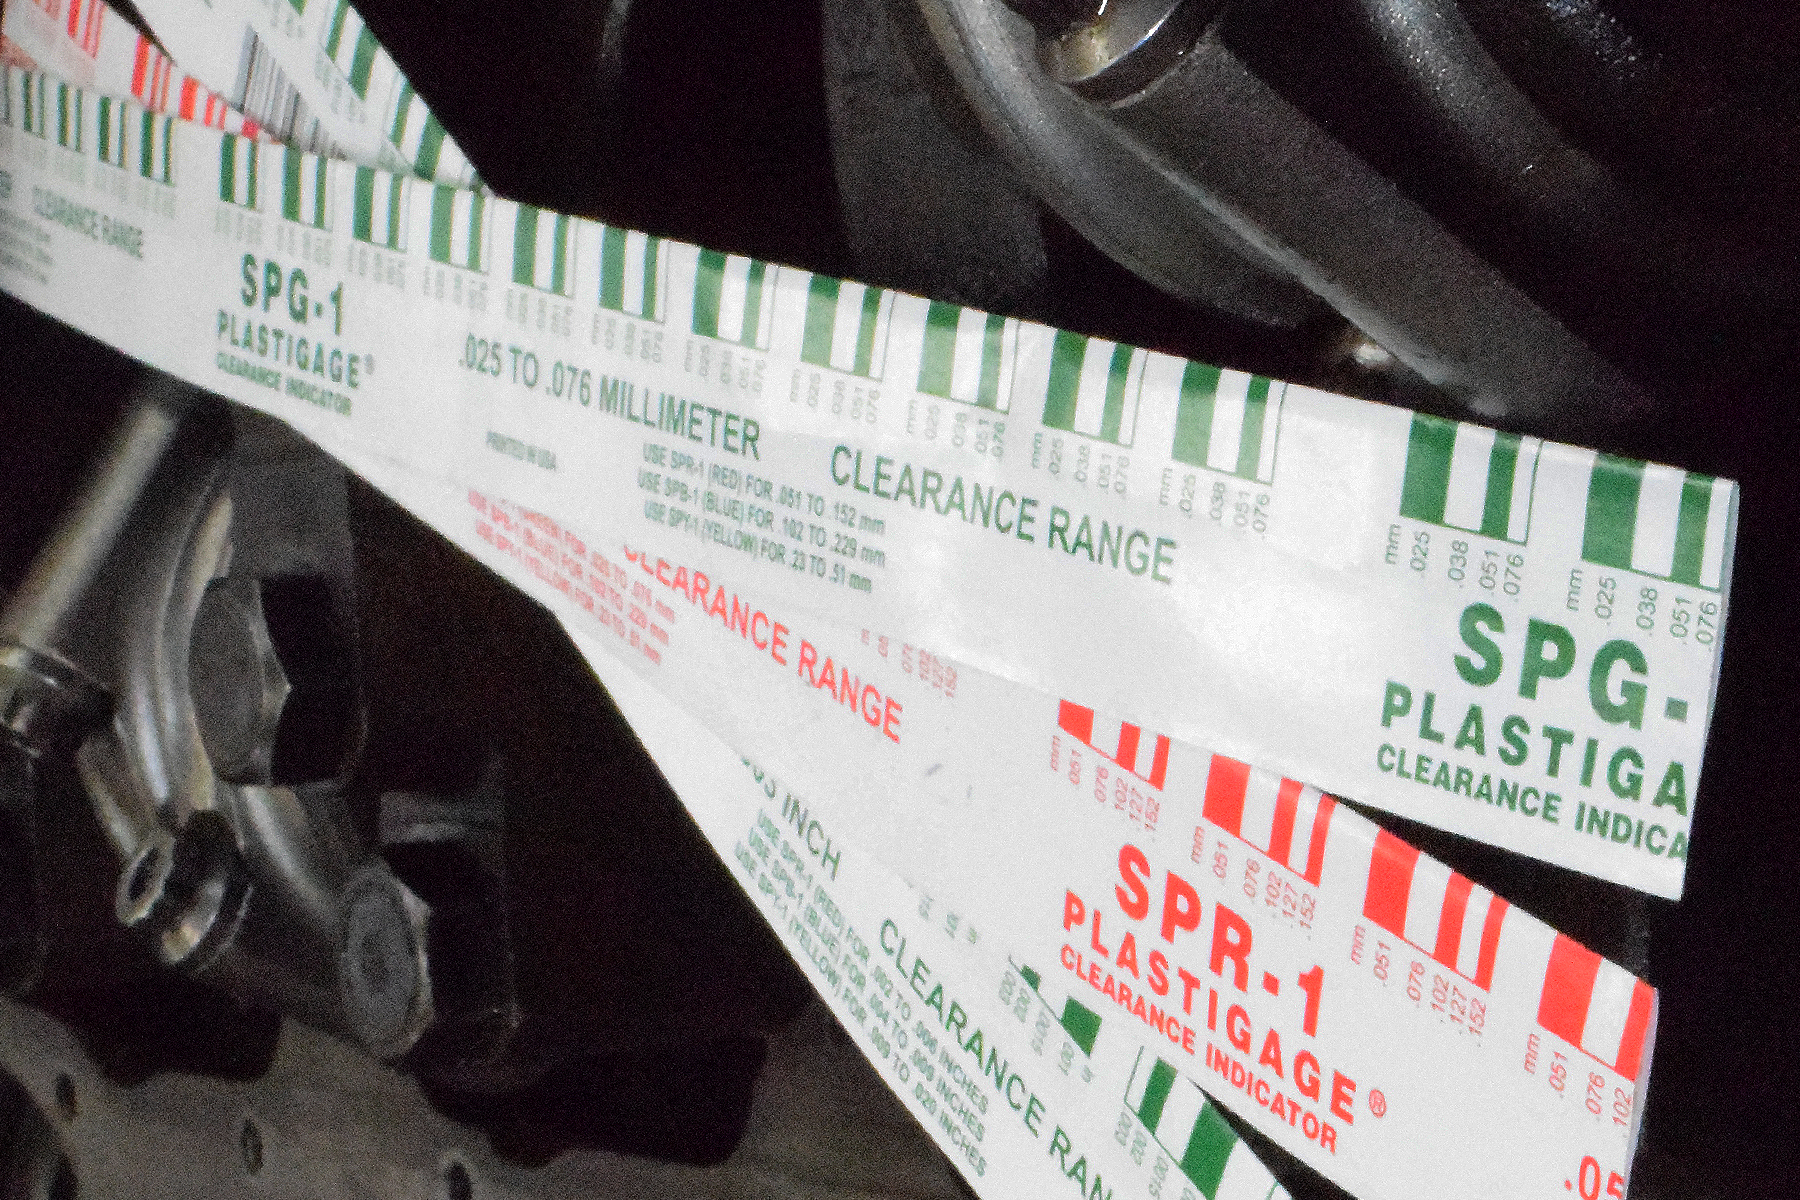
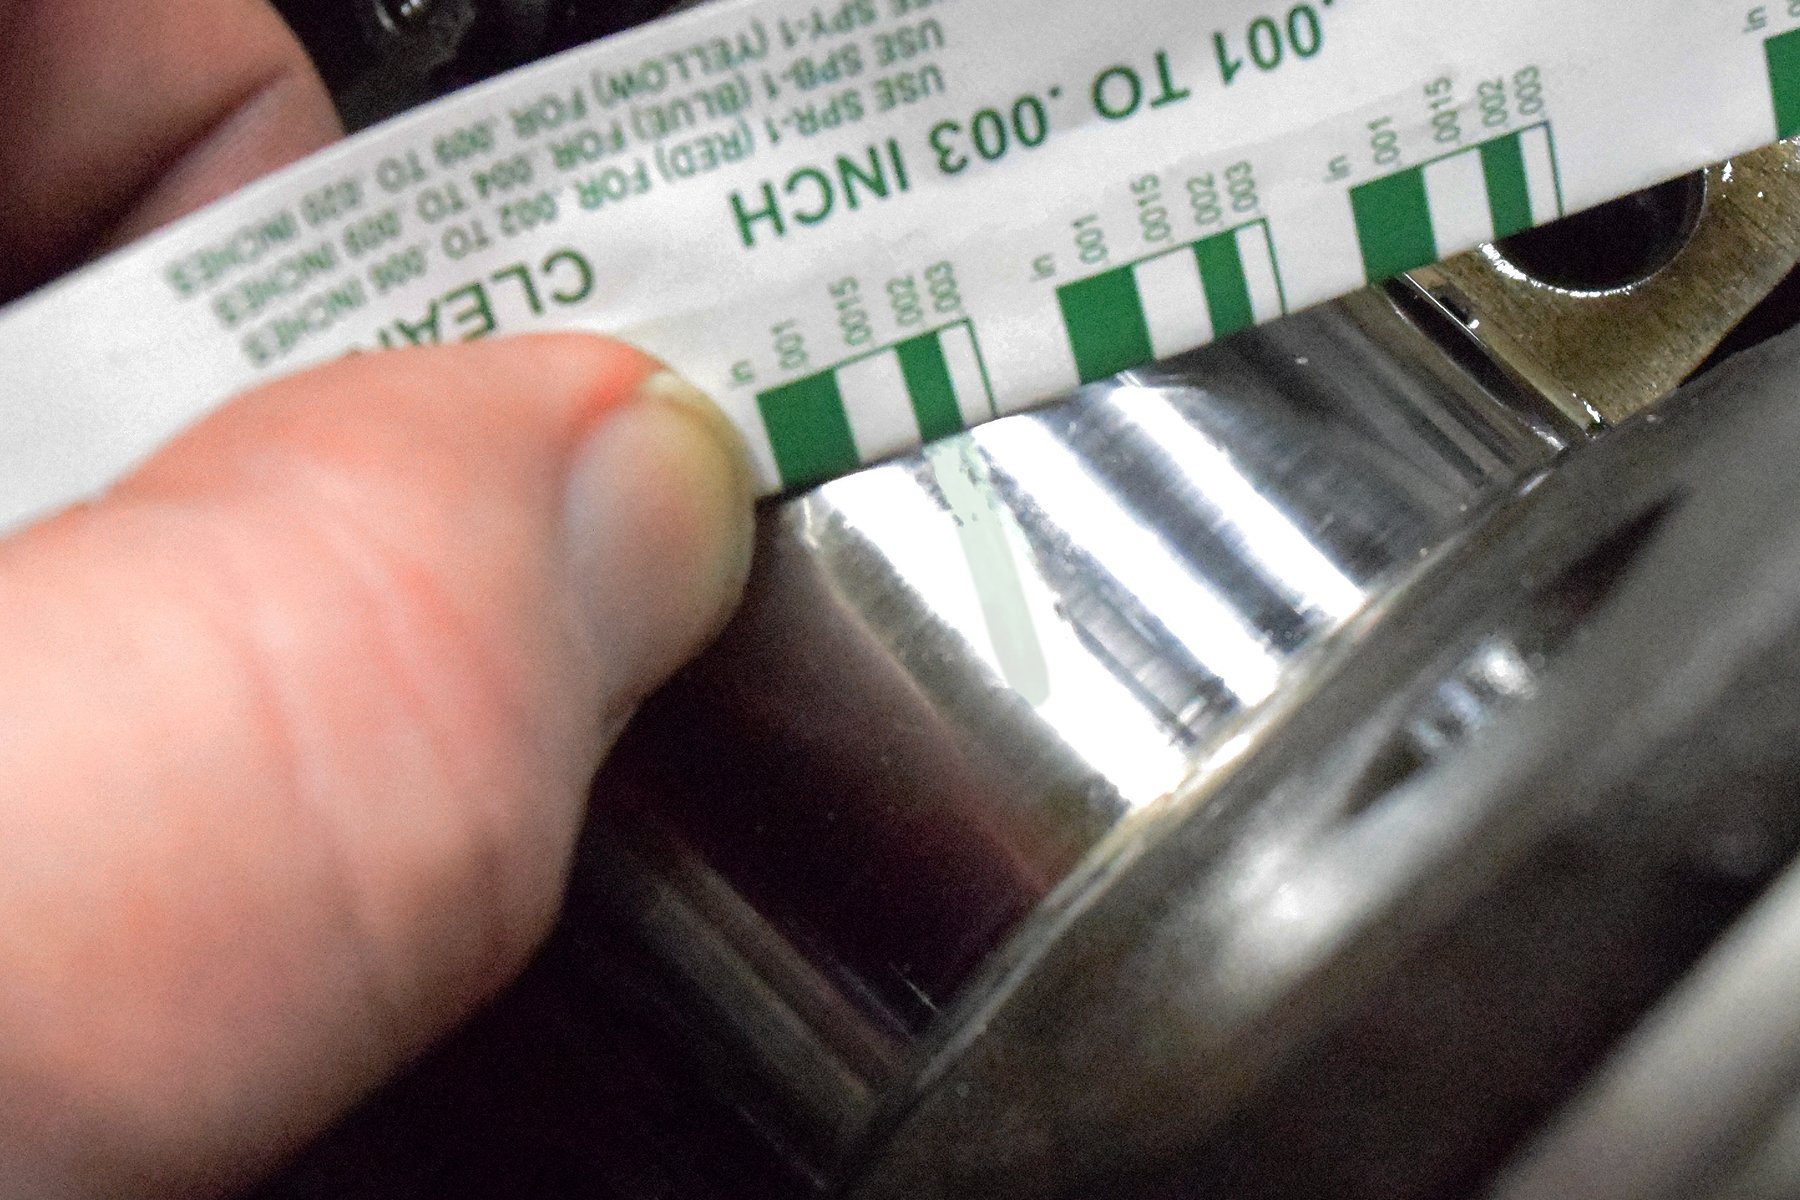
Plastigage is offered in three tolerance ranges for typical automotive use. The sizes range from green: .001- to .003-inch (.025- to .076-mm), red: .002- to .006-inch (.051- to .152-mm), and blue: .004- to .009-inch (.102- to .229-mm).
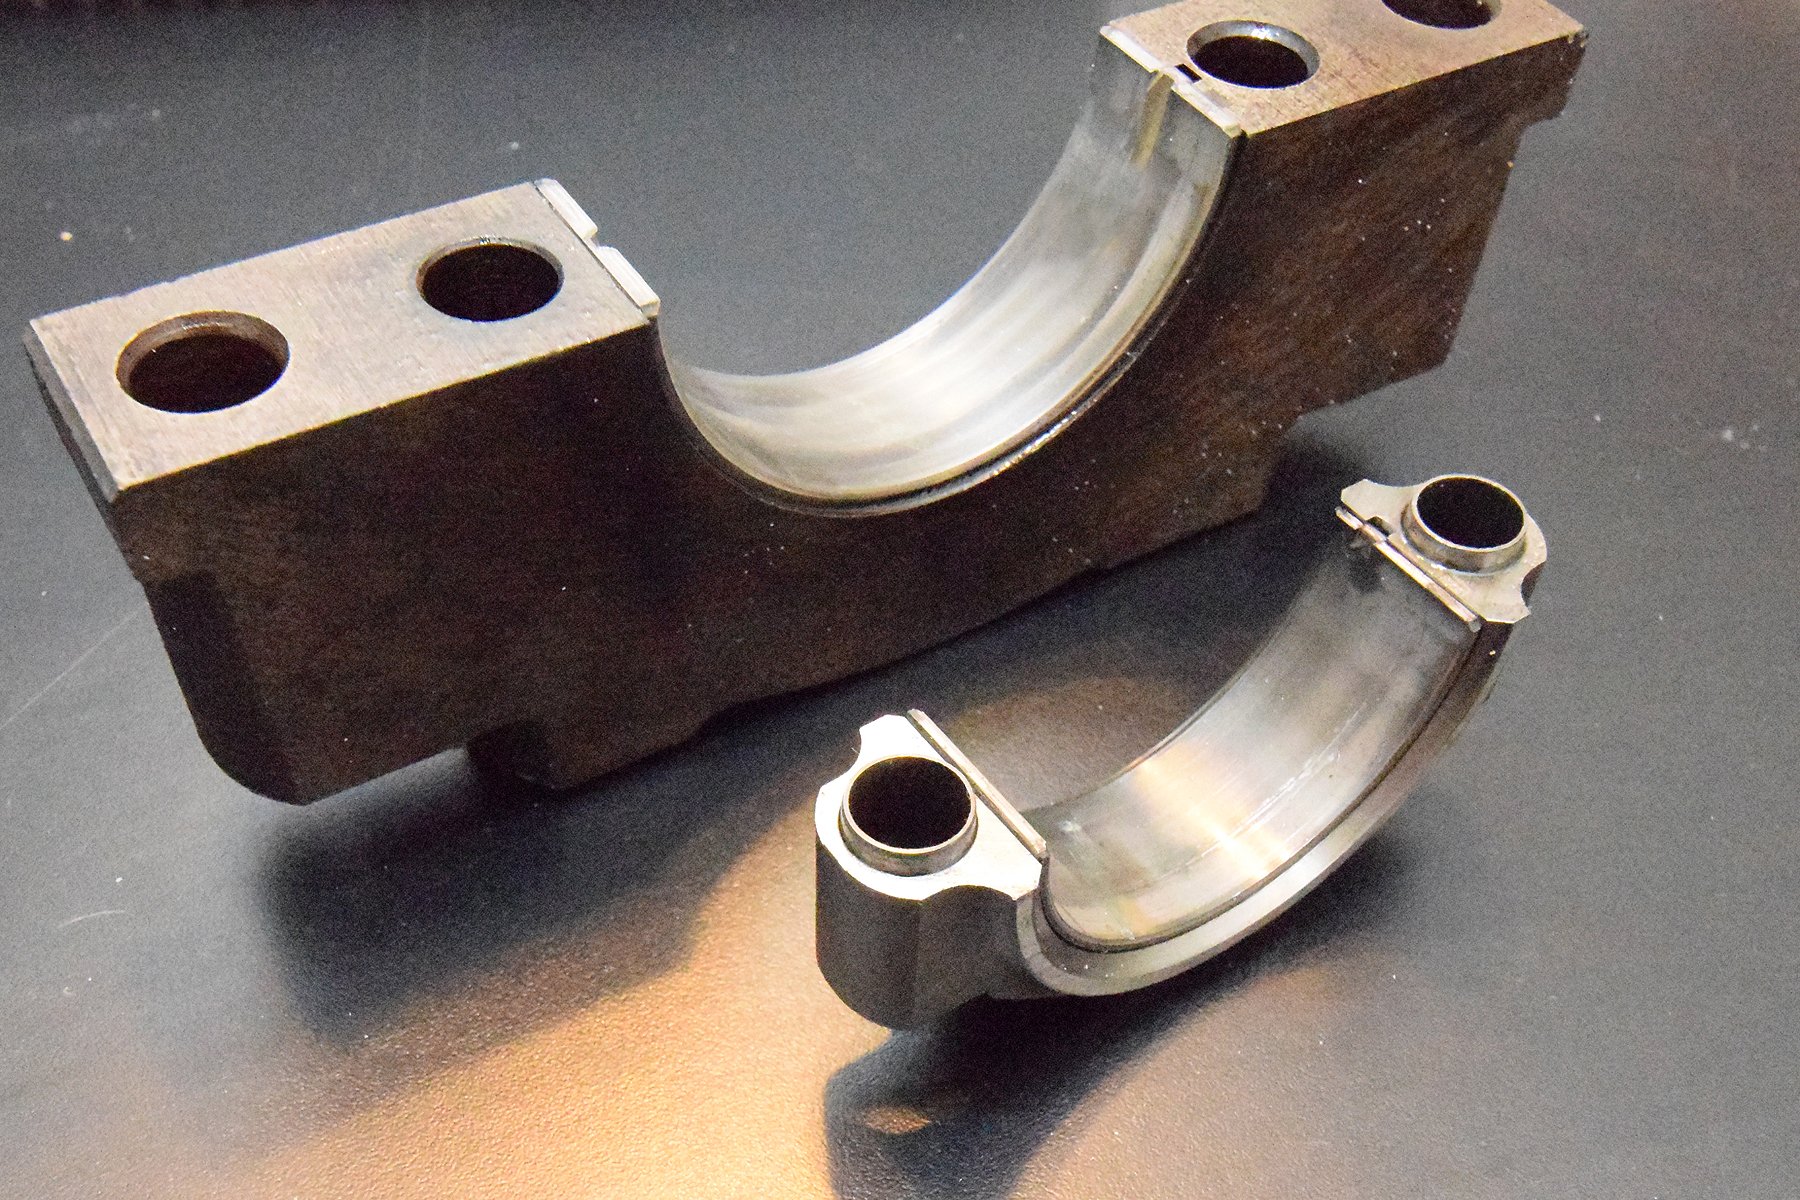
I first inspected each bearing for any signs of damage. If damage is evident, measuring tolerance is a moot point until you have the crankshaft checked and possibly polished or machined for future use. If you install new bearings, the use of Plastigage at this point would be a good step during reassembly.
When I purchased the Camaro, the seller told me the engine had no more than 25-passes on it since built new. This bearing inspection indicated that to be true with no damage or heavy wear indicators.

Cautiously torquing each cap to specification with the Plastigage in place is necessary to get an accurate thread crush.
I began testing the bearing tolerances one bearing cap at a time. Removing one rod cap at a time to install the Plastigage test seems like a reasonable precaution to avoid any switch-ups. Make sure not to place the test thread near any oiling holes as tolerances may differ around that area of the crank journal.
Remove, Retorque, and Repeat
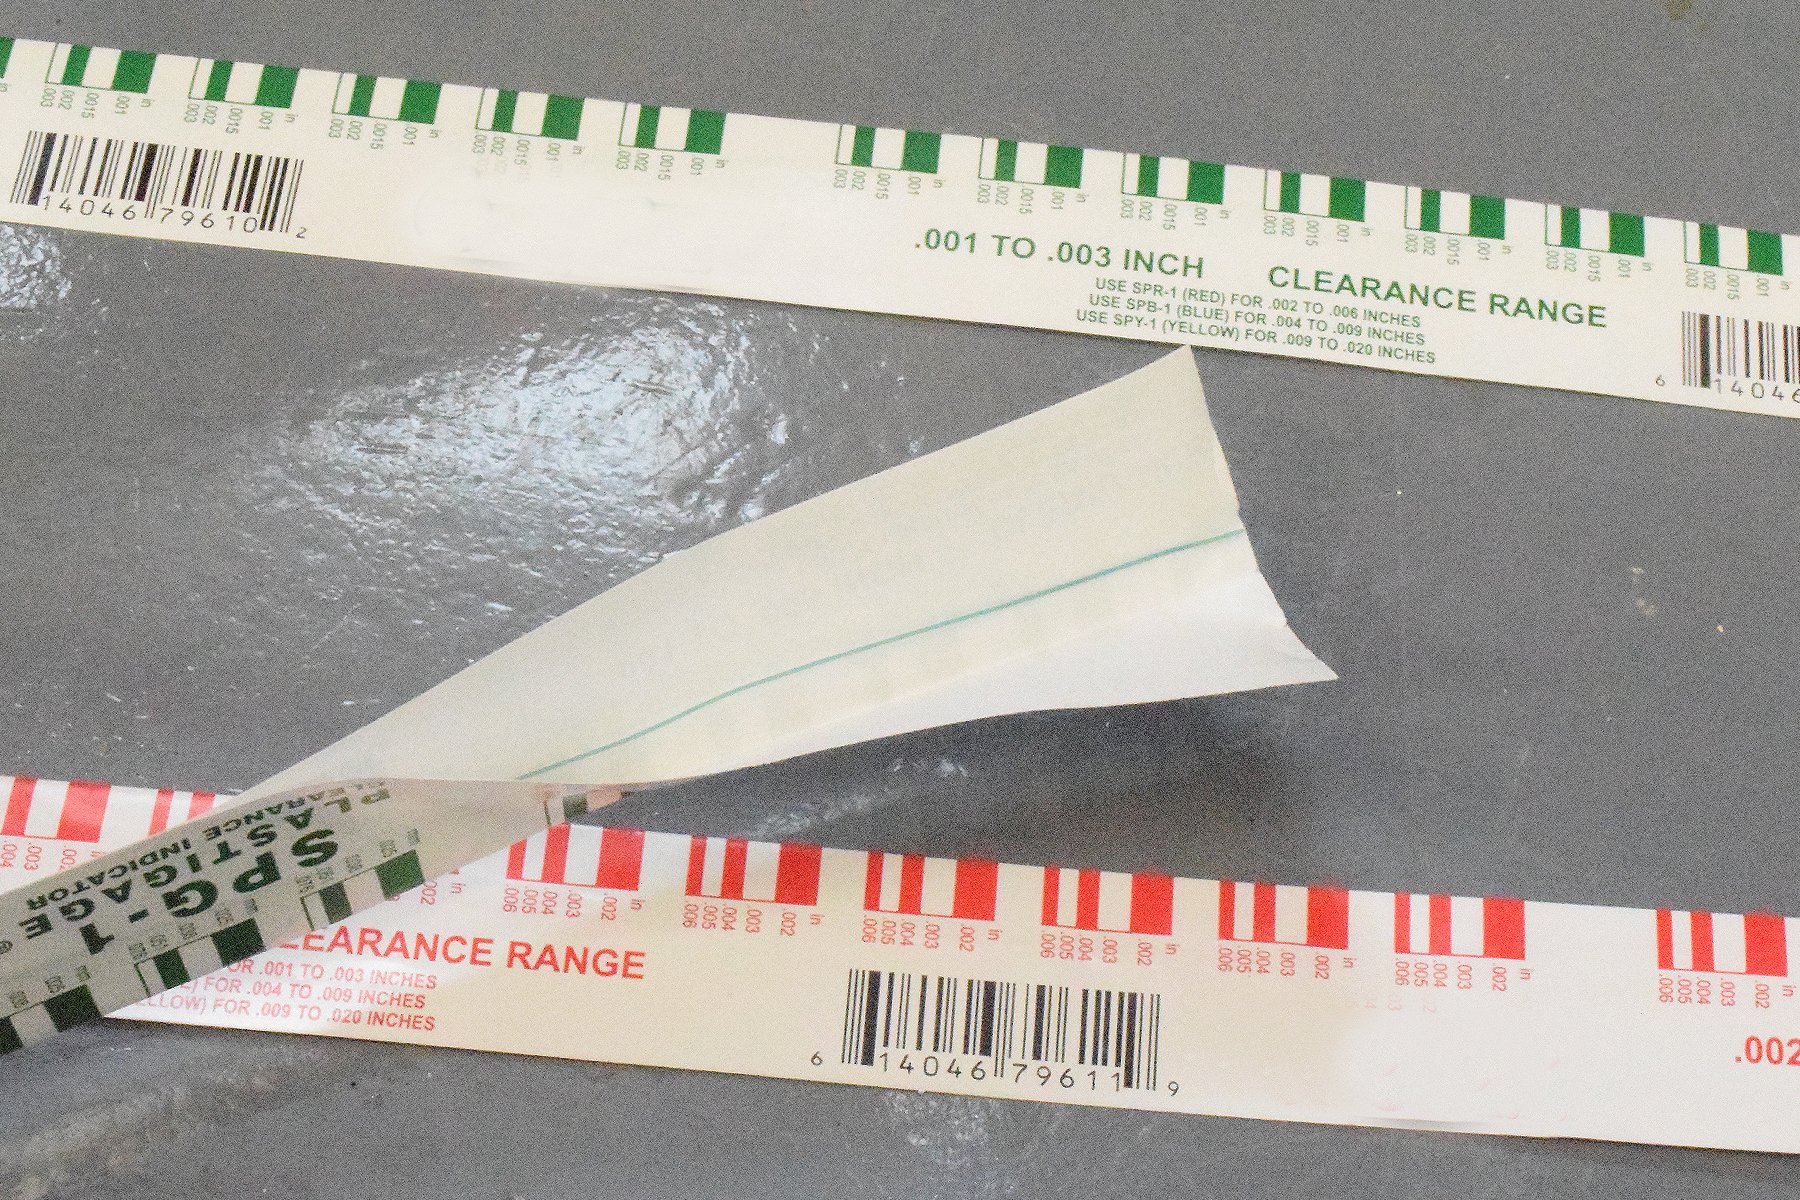
With the recommended bearing clearance from the engine builder noted, I used the green Plastigage. To gauge the results, use the printed ruler-type measurements marked on the thread wrapper. The wider the thread is when compressed, the tighter the bearing clearance.
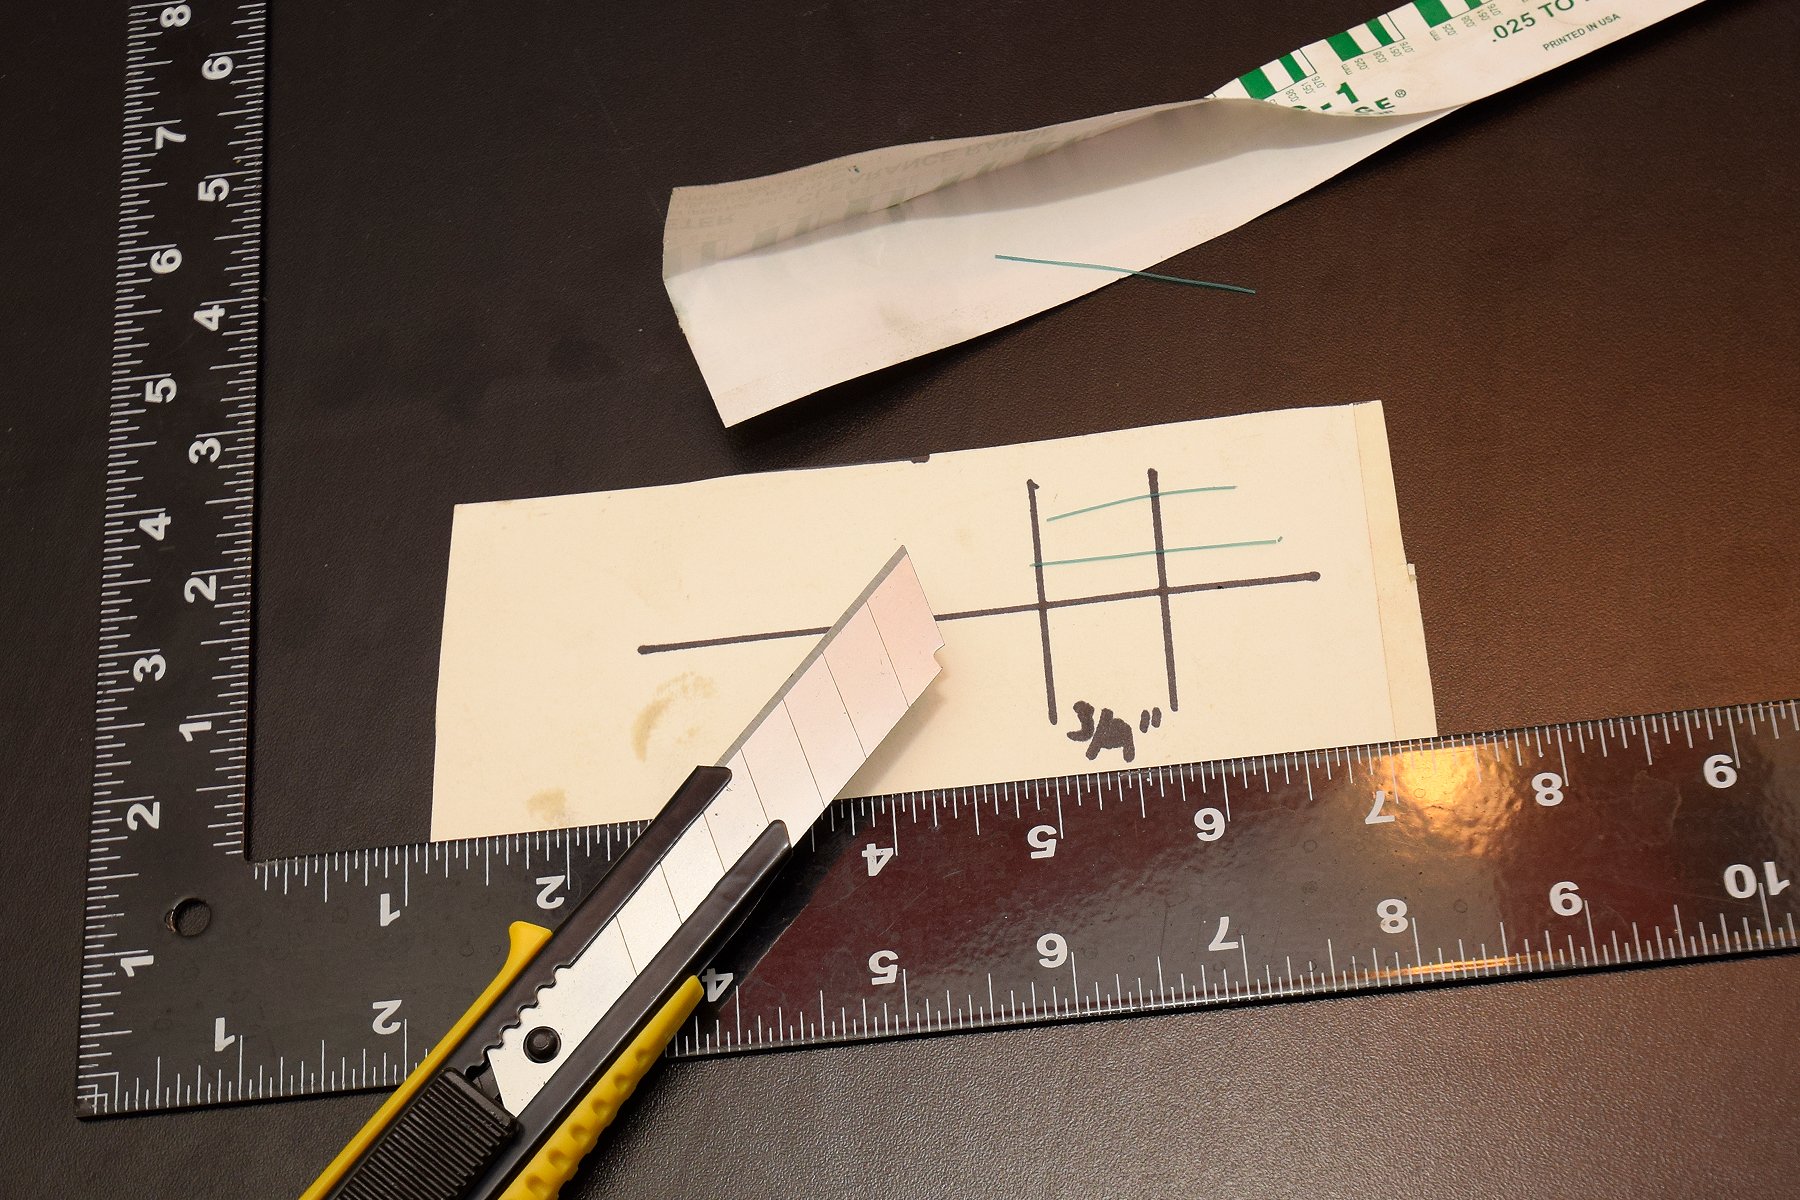
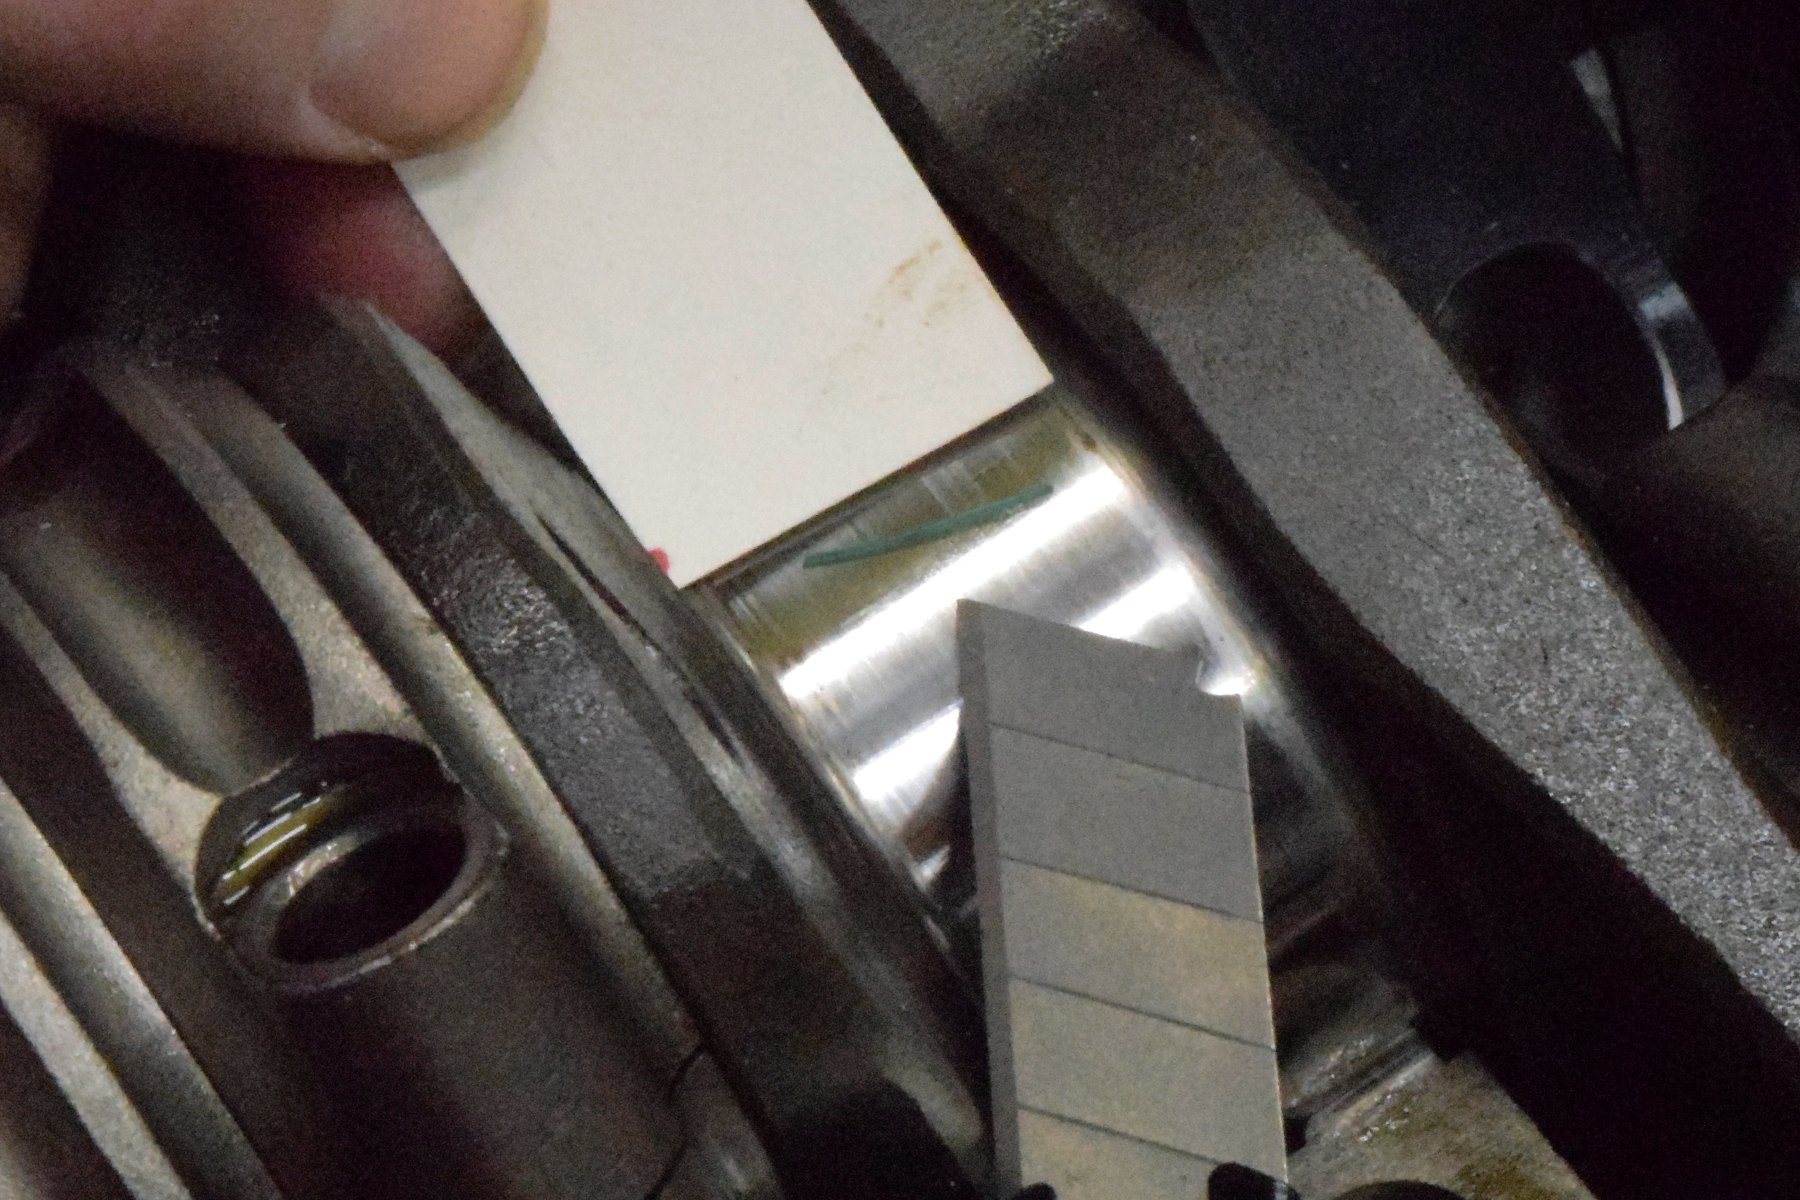
I use some heavy white cardstock paper to cut each piece of thread carefully. With Plastigage sections cut narrower than the journal width, we also use a narrower piece of cardstock to place the tread onto the journal face. This avoids accidentally crushing the thread if you try to pick it up and place it.
Thoroughly cleaning the bearing surface and the journal face before testing is absolutely necessary. Plastigage is intended to be used in a dry condition. Any oil or residue on the surfaces can throw off the compression results. Once installed, torqued to specifications, and then loosened, carefully remove the caps directly outward from the crankshaft face, as not to damage the compressed thread. Sometimes the compressed Plastigage will affix to the crankshaft journal or the bearing face.

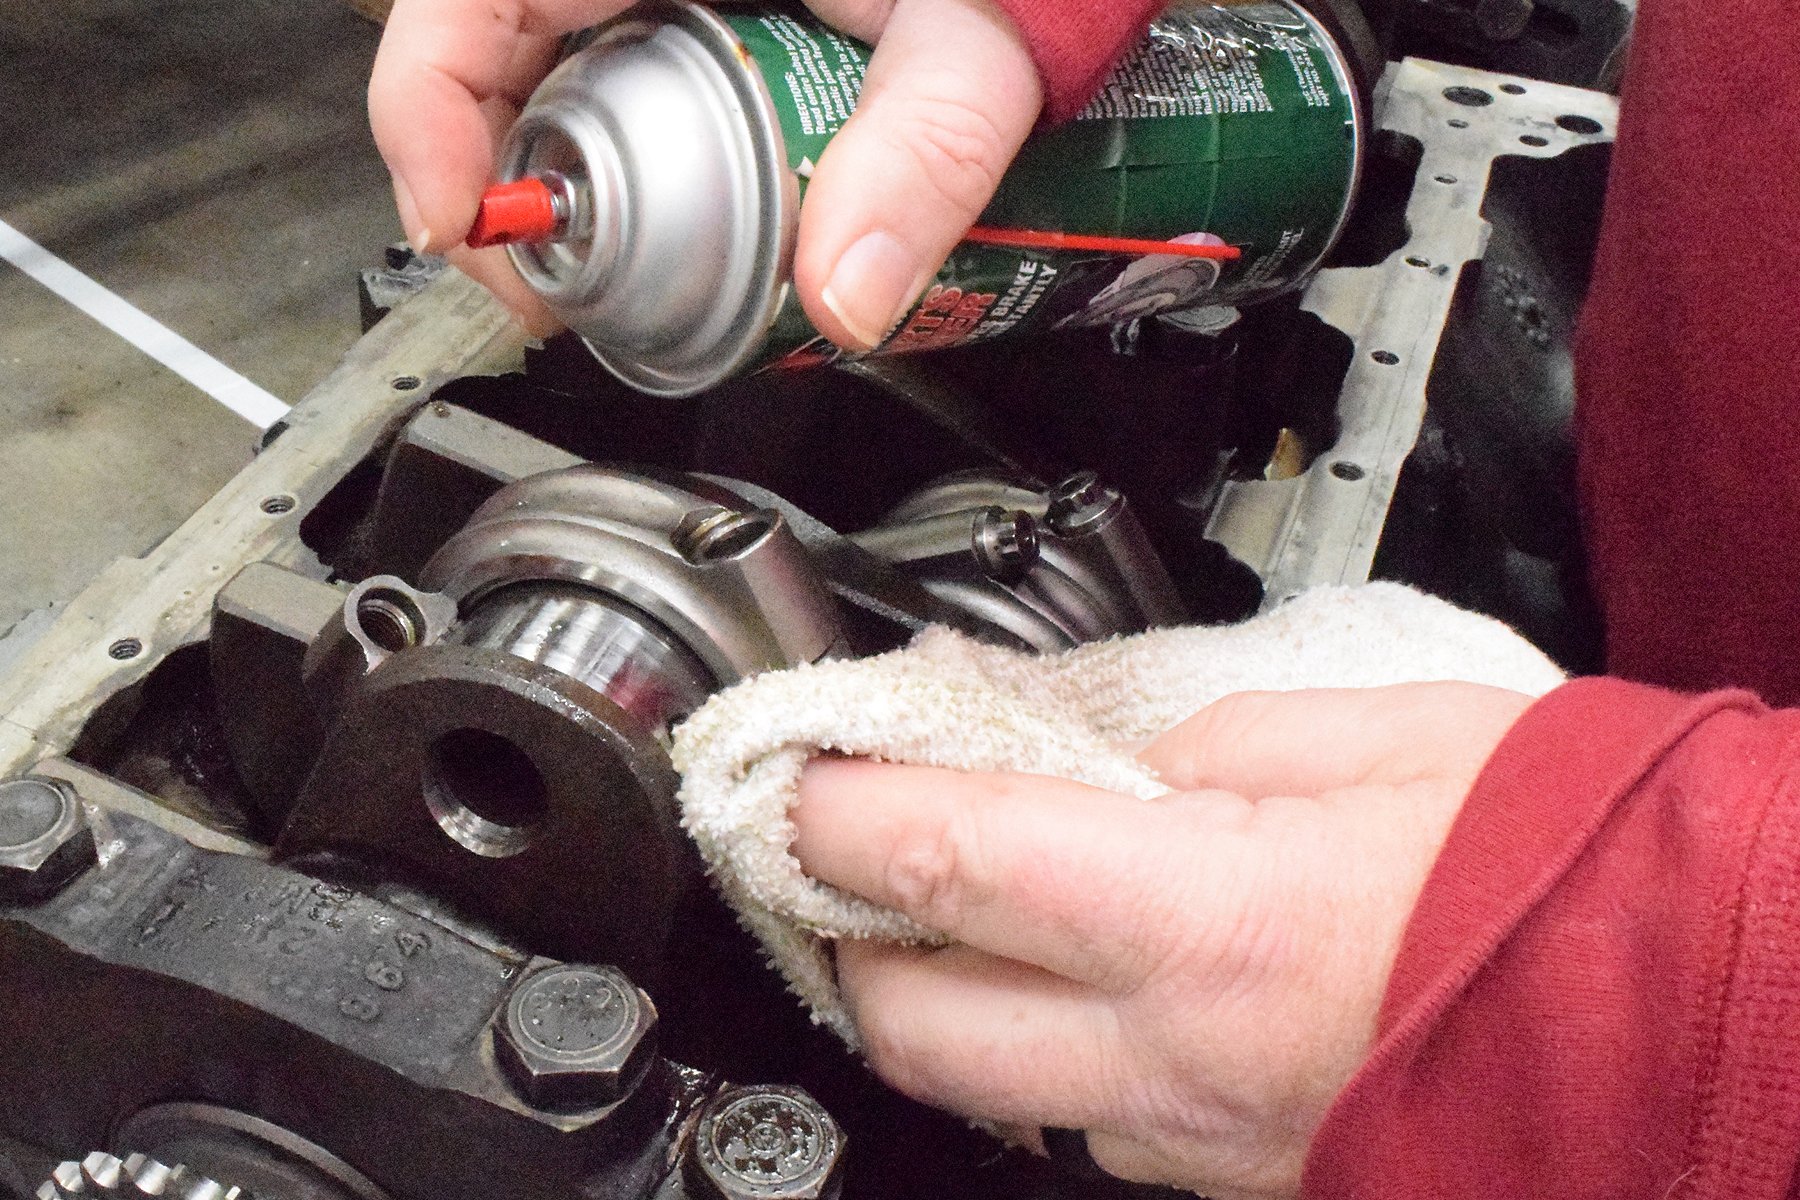
If your engine uses a main girdle or internal oil pump, make sure to perform the proper install, torque, and removal process to ensure any changes to bearing clearance measurements. We carefully clean all bearings and journals with brake cleaner as Plastigage is intended for use on oil free surfaces.
Trust, But Verify If Necessary
Once the bearing cap was removed, I matched our compressed thread with the width ruler on the thread wrapper. The thread compressed to just slightly wider than the .002-inch indicator. This measurement indicates the bearing clearance at just slightly more than .002 clearance or near our goal of .0020- to .0025-inch.
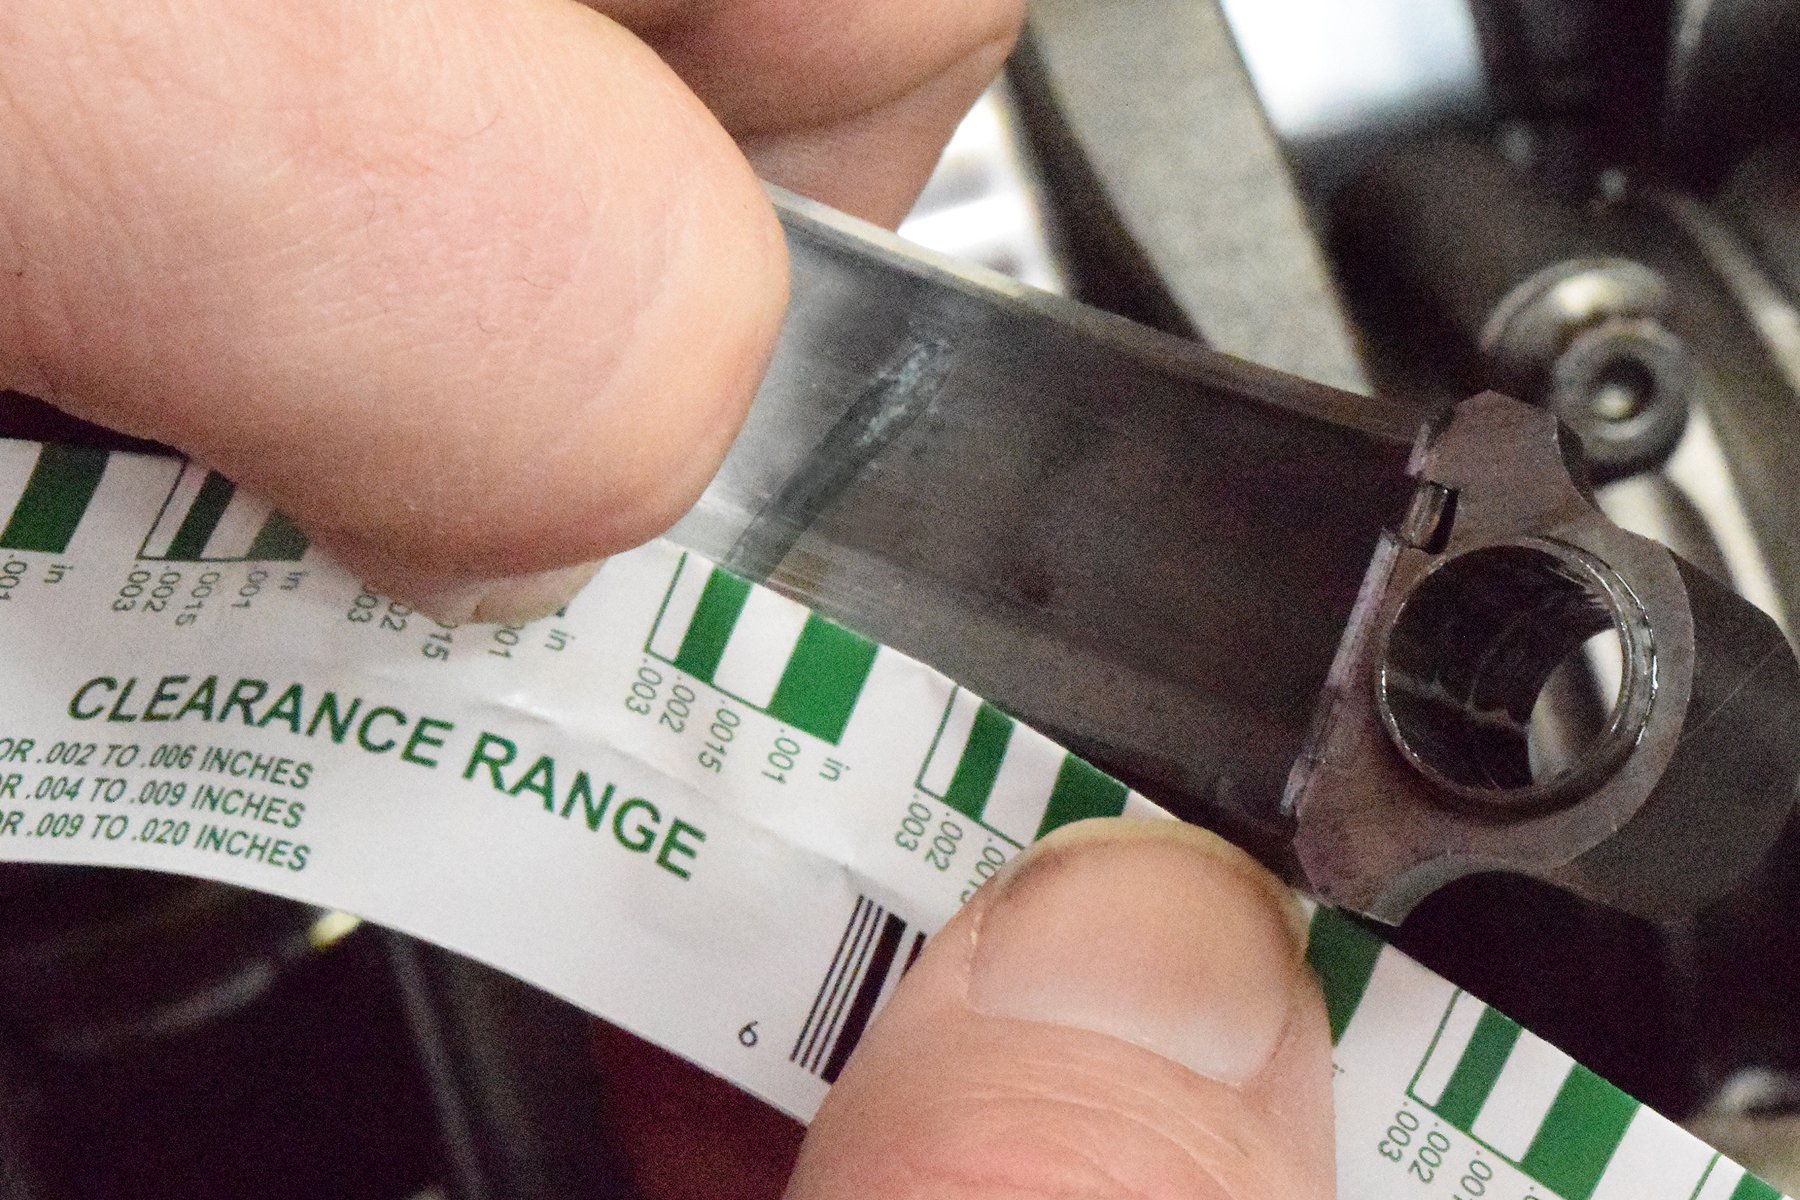
To gauge the Plastigage results, compare the crushed Plasigage to the thread wrapper markings. The wider the thread is compressed, the tighter the bearing clearance. When you carefully remove the bearing caps following the crush process, it may adhere to the bearing or the journal.
The bottom line is, Plastigage is a “trust, but verify” device for me. Many engine builders highly downplay the accuracy of the plastic thread. In contrast, many home builders swear by its use for the task, such as those I performed on our bracket engine.
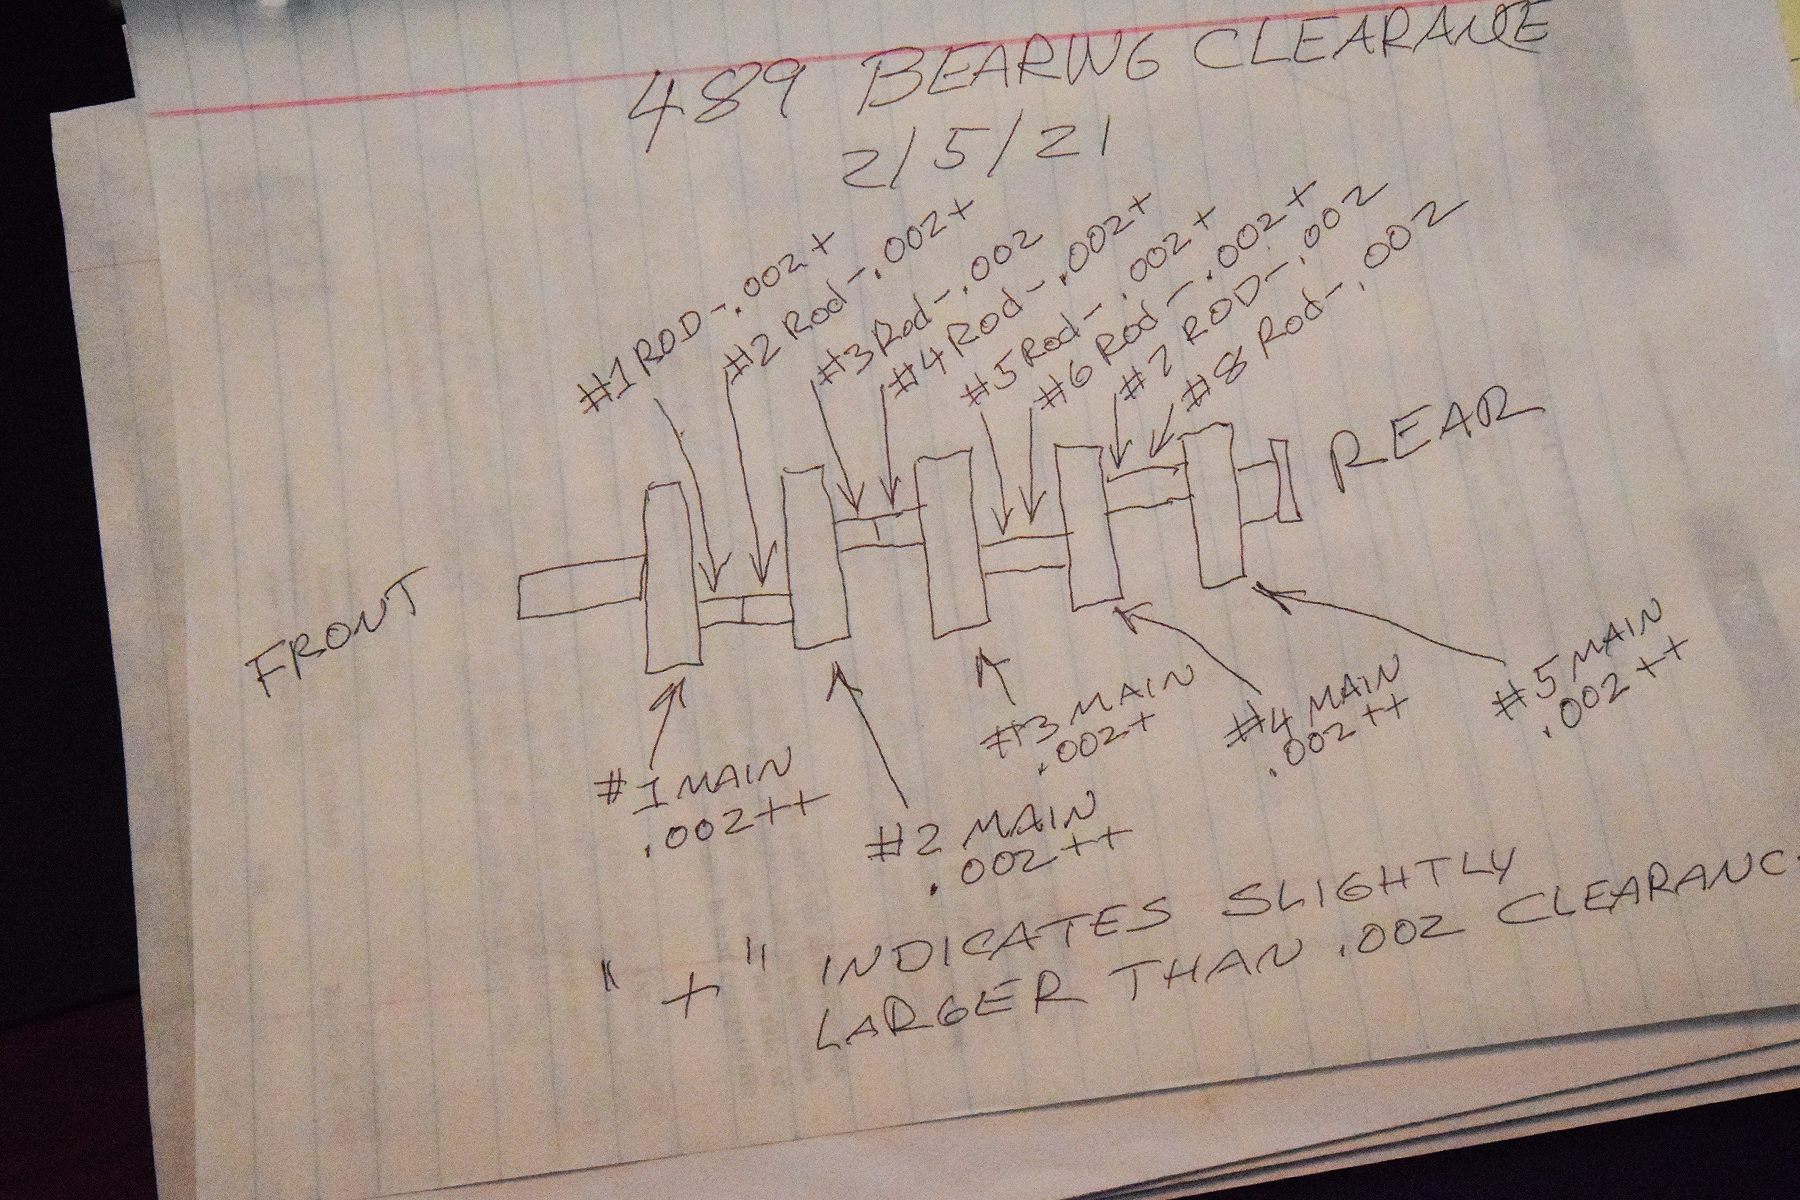
I logged each of our individual bearing clearances for our Camaro logbook. This is handy for future reference, and you can also spot trends such as a bent crankshaft. If the clearances incrementally change towards the center or at each end, it is wise to have a trusted crankshaft shop check for problems.
With some friends watching my Plastigage work within my own shop, one buddy asked me if coated bearings play any role with clearances. I passed the question along to Begle. He responded, “Clearance is clearance, no matter what the bearing type. Though coated bearings in a performance application is an entirely different subject, I would still set up my clearances the same, coated or uncoated.”
If you have the talent to tear down, build, and rebuild an engine in your shop, Plastigage is an excellent tool to help you verify “red flags” along the way. If bearings do not pass a visual inspection or you find they have fallen out of tolerance, it is time to visit your favorite engine machine shop.