Posted on Leave a comment

Why Bosch LSU wide-band sensors fail so often in aftermarket performance applications


Bosch LSU 4.9 Wide Band Lambda (oxygen) Sensor

Why Bosch LSU wide-band air/fuel ratio (or Lambda) sensors fail so often in aftermarket performance applications

Bosch is the world’s leading manufacturer of exhaust gas oxygen sensors. Their LSU range of wide-band sensors has been widely adopted by the OEMs and can be found on a huge number of production vehicles to accurately measure Lambda or the air/fuel ratio (AFR) in the exhaust system. Their common use as a mass-produced part has driven the cost of these sensors down significantly over the years and they have become very popular in the after-market performance tuning industry. We also, know that these sensors live in the harshest environment of all automotive sensors, but even so they have been designed with this in mind. On production vehicles it is common for these sensors to last for over well over 100,000kms. Yet in aftermarket performance installations it isn’t uncommon to hear of LSU sensors lasting for much shorter periods of time and in some cases failing very quickly. This article attempts to explain why this is. We’ll do this without getting into complex explanations of how these sensors work and all of the concepts discussed will be pretty easy for anyone to grasp. However, it isn’t a short article, so if you don’t feel like reading the whole thing then feel free to jump to the bullet points at the end. Once you understand how to avoid the common mistakes you should be able to get much better life out of these sensors.  

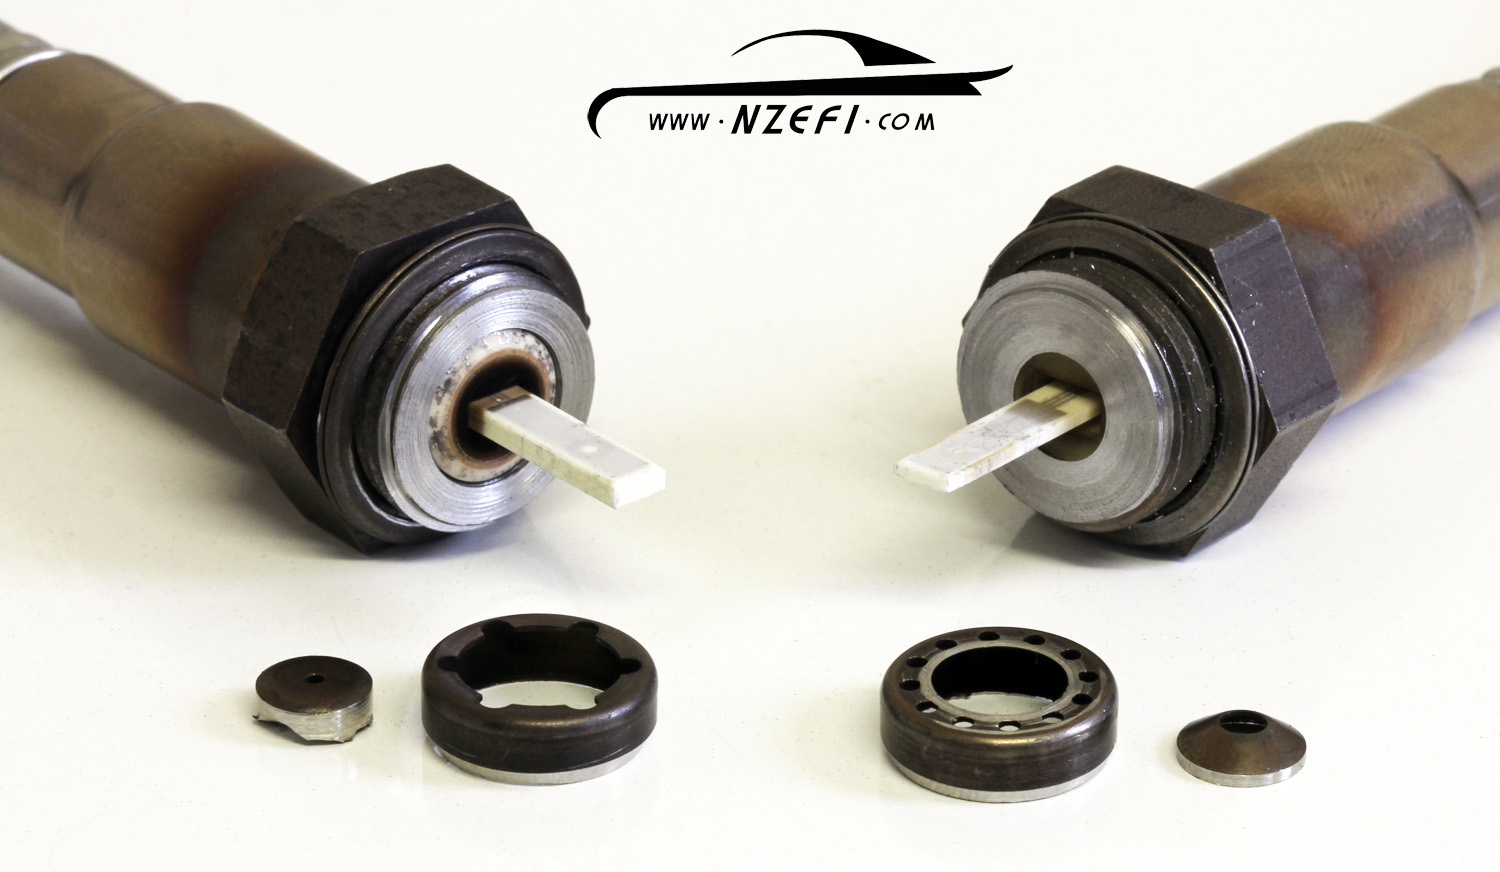
What they look like on the inside

All Bosch LSU sensors we have seen have two protective tubes which cover the internal sensing element. These are designed as a passage to allow exhaust gas to reach and pass over the sensing element as quickly as possible while trying to block contaminants and water droplets that could damage the sensor (more on that later). If you remove the outer protective tube then the inner protective tube becomes visible as shown below. This has been redesigned significantly between the earlier LSU4.2 sensors and the later LSU4.9. Supposedly, the revised design of the protective tubes on LSU4.9 allows faster and more turbulent flow of exhaust gas through the sensor resulting is faster response times.

Bosch LSU4.2 and LSU4.9 Sensors - Outer tube removed

Bosch LSU4.2 (left) and LSU4.9 (right) Sensors – Outer tube removed

Remove the inner tube and you’ll reach the sensing element. This is effectively a little printed circuit board, but instead of being fibreglass based (which wouldn’t handle the heat), it is ceramic based. Instead of having a bunch of components stuck to the top and bottom like a conventional circuit board (which also wouldn’t handle the heat) everything is built into the board as it is constructed in additive layers somewhat like a common 3D printer. This process is known as thick-film technology and the end result is you effectively end up with a small electrical circuit that can survive in very high temperature environments like inside an exhaust system. Looking at the complete sensing element you can’t easily see the circuit tracks or its components – it just looks like a thin wafer of ceramic material with all the clever stuff hidden on the inside. The entire sensing element on the earlier LSU4.2 sensors was approx 2mm thick and on the later LSU4.9 sensors the sensing element thickness shrunk down to approx 1mm thick as shown in the pictures below. The later thinner sensing element may contribute to the faster response times of the LSU4.9, but it is likely to be more sensitive to vibration and mechanical shock.

Bosch LSU4.2 and LSU4.9 Sensors - Sensing elements

Bosch LSU4.2 (left) and LSU4.9 (right) Sensors – Showing sensing elements

The ceramic sensing element consists of both a sensing circuit and a heater circuit. The sensing circuit should ideally be kept at a constant temperature of 780 degrees C, which is where the heater comes into play. While, the exhaust gas temperature (EGT) by itself will do part of the job to heat the sensor, the heater power must be carefully controlled in order to bring the sensing circuit up to exactly the required temperature and then keep it as close as possible to that target temperature. For example, when the EGT rises due to increased engine load and speed, clearly the heater power needs to be progressively decreased. Eventually at high enough engine speed and load the heating circuit will be turned off completely. And if the EGT continues to heat the sensing element beyond 780 degrees C then the controller can’t do anything to reduce it.

During engine starting the sensing circuit cannot not be activated until it has reached at least 600 degrees C. Therefore, ideally you want to get it up to temperature as soon as possible. However, fast temperature changes in the sensing element (either heating or cooling) will cause it to fracture and fail so that prevents the heater being turned on at full power straight away. But there is another very good reason why in most cases, the heater circuit power must stay reduced for an even longer period of time . That all comes down to condensation that has formed on the inside of the exhaust system during the last time the exhaust cooled down.

Thermal shock – a leading cause of failure

You may have noticed that when you start a cold engine, quite a lot of water will come out of the exhaust system as the engine warms up. Sometimes it is just a light mist, but in other cases drips or even a trickle can be observed particularly if you rev the engine when it is cold. This is the result of moisture that has condensed on the inside of the exhaust being blown out and/or evaporating. Bosch is well aware of this phenomenon and their LSU sensor technical documents are littered with comments about it and what do to about it. Remember that the sensing element can’t be heated or cooled too quickly or it will fail? Well if your sensor is heated up to full temperature before starting a cold engine then those cold droplets of condensation will hit the hot sensor and destroy it very quickly – this is commonly referred to as thermal shock. As a result Bosch thoroughly points out that the sensor heating must only start after the engine is running and even then the heater power should be limited to about 15% of its full value until condensed water is sure to be gone. Only then should high-powered rapid-heating of the sensor occur. The following comments come directly from Bosch:

In the warm-up phase at engine start, the sensor is operated with reduced heater power..……. The heater power must only be increased when the presence of condensed water in the exhaust gas system can be ruled out.”

The sensor ceramic element is heated up quickly after heater start. Prior to heating up the ceramic element, it must be guaranteed that there is no condensed water present. This could damage the hot ceramic element.”

Never switch on sensor heating or the control unit before engine start.”

….. the sensor installation location design must be selected in a way to minimize, or eliminate, condensed water on the exhaust gas side from contacting the sensor. If this is not possible by design measures, the start of the sensor heater must be delayed until demonstrably no more condensation water appears.”

We could go on an on listing more similar quotes from Bosch, but you probably get the point by now. It’s pretty clear – never let cold droplets of condensation hit your fully warmed up wideband sensor. But that is exactly what often happens in so many installations using after-market air/fuel ratio or lambda controllers designed specifically to work with these sensors.

Limitations of many aftermarket controllers

Most cars that have a wide-band Lambda sensor as a factory fitted part will have their Lambda sensor controlled directly by the engine control unit (ECU). This means that the sensor’s controller knows exactly when the engine is running. Additionally, on a production vehicle where every sensor is installed in the same place, the ECU has the ability to calculate how long it will take for condensation upstream of the sensor to be cleared after a cold start.

In contrast, most stand-alone aftermarket wide-band Lambda sensor controllers have the Lambda sensor itself as their only input. Without engine speed information, they generally assume that the engine is started as soon as the ignition is turned on and the controller is powered. Also, if the sensor is mounted at a position in the exhaust further away from the engine then most stand-alone controllers have no way of knowing this. Therefore, during a cold start, the delay time until high powered heating occurs will not be increased.

Misleading Information

Bosch also tells us the following:

The sensor must not stay in the exhaust gas stream when it is not heated or when the control unit is switched off.”

Most manufacturer’s of aftermarket wide-band Lambda controllers, pass this point on in their instruction manual in one form or another. It is indeed true that leaving a sensor in the exhaust system without it hooked up to a fully functional controller will kill the sensor. However, doing this for a couple of seconds isn’t a problem. In talking with many of our customers who are the end user’s of aftermarket wide-band controllers, we have often found that many interpret this piece of information to mean that the sensor needs to be fully heated up BEFORE starting the car. In reality nothing could be further from the truth. It isn’t a co-incidence that these customers are the same ones that are killing sensors frequently. After having a brief chat with them and setting them straight their ongoing sensor problems often disappear.

Our recommendation

To get the best life out of your wide-band lambda sensors, we recommend the following:

  • Consider using a controller that is either integrated into an ECU or one that receives an engine speed input via a wired input or over CAN bus. Options meeting this criteria include the Link G4+ Fury, G4+ Thunder, or using Link’s external CAN-Lambda controller with a suitable ECU.
  • If using a stand-alone controller without an engine speed input, never let your controller heat the sensor prior to starting the engine. One way to guarantee this is to power the controller off of its own relay which is not turned on until after the engine is started.
  • Place your sensor less than 1m from the engine in a position upstream of any parts of the exhaust system where condensation is likely to pool or settle. In high exhaust gas temperature applications, consider using a longer heat-sink type sensor boss rather than moving the sensor further from the engine.

Other factors

While we think that thermal shock (as described in this article) is a leading factor that kills wide-band Lambda sensors in aftermarket installations, it isn’t the only factor. Other more commonly known factors include:

  • Mechanical shock – remember that 1mm thick ceramic wafer on a LSU4.9? It wont handle excessive vibration, being dropped or the exhaust system it is fitted to making contact with the ground (ripple strips etc).
  • Contamination – Oil burnt as part of the combustion process (worn out four stroke, or any two-stroke or rotary applications) or worn out turbo seal rings will reduce the life expectancy of a sensor. Particulates from an excessively rich tune, lead from leaded fuels, anti-freeze from a blown head gasket or excessively applied silicone sealant are other possible contamination sources.
  • Excessive EGT – While LSU4.9 sensors are actually rated to be able to withstand exhaust gas temperatures as high as 980 degrees C, if the sensing element goes too far above the controlled target temperature, then many aftermarket controllers will enter a fault mode. In the fault mode the controller may stop controlling the sensor which is effectively like not having the controller turned on at all while the sensor is fitted to the exhaust. Therefore continuing to drive while the controller is in a fault mode can kill a sensor that would otherwise be fine. Resetting the controller to get it out of fault mode can typically be done simply by turning the controller off and back on again.

Conclusion

We hope that the information provided in this article will help save many wideband AFR/Lambda sensors from an untimely death as well as saving our customer’s the aggravation and cost of having to replace their sensors more frequently than necessary.


Posted on Leave a comment

What is E85?


What is E85?
E85 is a fuel that is starting to be sold more and more at stations across the country. While it has been around for quite some time, it is just now starting to take hold in the US. In some country’s, E85 is a more popular gas than regular gasoline. E85 is a fuel that is made of 85 % ethanol, and 15% gasoline. One thing to note though is that most gas stations can carry variants on this fuel from E70 all the way to E90. It should be noted that E70 and E90 are made up of just what the name says…..70% Ethanol for E70 and 90% Ethanol for E90 with the other percentage made up in gasoline. To know what your current station is pumping you use an ethanol tester or sensor like those found below:

What makes E85 Special?
At first one would think that using E85 would make little sense being that the BTU rating of ethanol (also called Ethyl Alcohol) is less than that of gasoline, meaning it has less British Thermal Units (energy) per molecule, but that is not true. Each fuel has its own BTU rating just like Natural Gas, and even though Ethanol based fuels have a lower BTU rating than gasoline, they require you to inject such a large quantity to reach stoichiometric combustion that the actual amount of molecules in the combustion chamber is greater so the total number of BTU’s is greater also. On avg you can expect to gain around 5% more efficiency on a high ethanol based fuel. Other low BTU fuels would be like those on natural gas. Engines that have received CNG Conversions would be a great example.

SO IF I RUN E85 WILL I MAKE 5% MORE POWER?
This brings up the idea that just like adding high octane race gas to a stock motor on stock timing, you will see little to no gains, the same is true with running E85 with no tune. In fact, you can actually lose power not to mention it takes 20%-30% more E85 to reach stoich so I would doubt the car would idle much less run on E85 without a change to the cars ECU to tune for it. E85, like race gas, is for those of us who are pushing cylinder pressures to the limit. What “potentially” makes it better than race gas is the price.

Uses for E85
Because of the alcohol/gasoline mixture, E85 has a rough estimate octane rating of between 105-113 octane depending on the mixture. Also the alcohol in E85 has a HUGE cooling property associated with it as well. E85 has a lot of the cooling properties that you also find with Water Meth Injection. (www.enginebasics.com/methinjection) It is great at lowering intake temperatures, lowering engine block and head temperatures, and basically doing everything that can help suppress detonation. So with E85 being SO amazing, why don’t we all convert over and start using it?

Cons for use
Because of the fact that E85 has a BTU rating of around 30% less than that of gasoline, it also has a stoic burn that requires 30% more fuel than Gasoline. Because of this most should understand that to convert over to E85 takes more than just putting it in your gas tank. You need to be able to flow 30% more fuel than what you are flowing now. Then again you are converting to E85 so you can make more power, so you are most likely going to require even more fuel than just the 30%. To get to the point, you need to double the capacity of your fuel set-up on all accounts. This means, fuel pump, fuel rail, fuel lines, fuel regulator, fuel injectors……and so goes the list. In summary if you are looking to push the envelope of your motor, but don’t want to pay the 5 to 8 dollars a gallon for race gas, E85 is your fuel.


Posted on Leave a comment

Head Bolts vs. Head Studs

When evaluating the various benefits of studs and bolts, it is helpful to keep a number of considerations in mind. Ease of engine assembly and disassembly can be a significant factor, as well as torque pressure, gasket alignment, and overall engine performance. The power and acceleration potential of an engine often dictates the type of head fastener that will be used. For example, a high-end or racing model car will have drastically different engine fastener requirements than a vehicle designed for everyday purposes.
Torque Efficiency
During engine assembly or maintenance, a bolt must be installed by torqueing it into place. Due to the head bolt’s design, it has to be rotated into its slot in order to engage the threads and secure it into place. This process creates both twisting force and a vertical clamping force, which means that when the cylinders within the engine’s combustion chamber begin accumulating load, the bolt will both stretch and twist. Because the bolt has to react to two different forces simultaneously, its capacity to secure the head is slightly reduced and it forms a less reliable seal in high-powered engines.
By contrast, a head stud can be tightened into place without any direct clamping force applied through the tightening. A stud can be threaded into a slot up to “finger tightness,” or the degree to which it would be tightened by hand. Afterward, the cylinder head is installed and a nut is torqued into place against the stud. The nut torque provides the clamping force, rather than the torque of the fastener itself, and the rotational force is avoided entirely. Because the stud is torqued from a relaxed state, the pressure from the nut will make it stretch only along the vertical axis without a concurrent twisting load. The result is a more evenly distributed and accurate torque load compared to that of the head bolt. This ultimately translates into higher reliability and a lower chance of head gasket failure.
In other words, head studs are better suited for high-performance vehicles with greater power requirements, while head bolts are more practical for personal, everyday automobiles. Therefore, it would be inaccurate to conclude that one type of fastener is categorically superior to the other. Rather, the preference depends on the automobile in question and the ways in which it will be put to use.
Posted on Leave a comment

Fuel System Filtration

Fuel System Filtration by Paul Yaw @ Injector Dynamics


Just like an oil filter protects your engine from harmful particles of ‘trash’ that will cause damage to engine
components, your fuel filter protects your injectors.

We have seen a lot of injectors come back for inspection with a deviation in flow that is the result of
improper filtration. I don’t think anyone intends to build a fuel system that’s not right, it’s just not
understood in full by many. We want to change that!

Fuel filters are rated in microns. A micron is a unit of measurement, equivalent to .000039 inches. (39
Millionths of an inch.) The symbol for micron is µ, though you don’t see it too often in fuel filter ads.

To put this into perspective, a human hair is about 100 microns in diameter. Anything less than about 30-40 microns
can no longer be seen with the naked eye. A ’10 micron’ filter will block contaminants larger than 10
microns, and let those smaller than 10 microns pass.

Here’s Bosch’s take on fuel injector filtration.

“Resistance to Fuel Contamination – Quality of the Medium. Dirt particles and contaminants in fuel
represent a potential danger to the fuel injectors. They are to be avoided in order to preserve the correct
function of the injectors. The dirt content in the fuel system must therefore be minimized via a suitable
filter. Recommended filter quality: nominal rating 5µ, minimum 82% capture efficiency according to ISO/TR
19438; dirt particles >35µ are not permissible. The basket filter in the injector serves only to catch
residual particles. Nonconformance of the recommended filter quality can cause damage to and failure of
the components”

So Bosch recommends a 5µ filter and says anything over 35µ can cause injector damage. Think about that,
things you can’t see with your naked eye are big enough to cause damage to a fuel injector. Not only is there
the concern of the contamination clogging the internal filter enough to cause a reduction in flow, but the
contamination that makes its way into the injector scores the bore, affecting critical tolerances.

Seems simple enough, so why are so many people misinformed? I hear pretty regularly that people are told
by fuel filter manufacturers that their 10µ filters are not ethanol compatible, so if they’re going to run
ethanol, they need to run a 40µ or bigger stainless element. While this is true, a stainless element is much
better for use with ethanol, the manufacturer has just made a recommendation that will likely cause
injector problems down the road. People don’t like to hear this after the damage, trust me!

The filter before your pump serves mainly to protect the fuel pump. Depending on the pump, usually a 30-
100µ filter is used here. The filter after the pump serves to protect the injectors and as noted, needs to be
much finer. Being that the filter is protecting the injectors, anything after the filer is technically not
filtered. This isn’t a big concern in OEM fuel systems which mostly have hard lines, but when you’re plumbing
your race car with rubber hose, do yourself a favor and put the fuel filter right up by the rail inlet. This will
leave the least amount of unfiltered fuel system and protect your injectors.

A 12µ filter is generally sufficient and they are readily available, with paper elements. If you’re running
ethanol I suggest digging a little and finding a 12µ or similar ethanol compatible element. The 6 and 12 micron
microglass, ethanol compatible fuel filters, have done well in our testing and are recommended.

Also, stay away from small fuel filters, especially those tiny ones with a single round screen disk. Those
shouldn’t even be allowed on the market. The least bit of contamination and they’re clogged enough to be a
major restriction in the system. The more surface area your filter has, the longer the service interval will
be. A pleated filter cut apart and stretched out would probably surprise you with how much surface area of
filtration there is!

Posted on Leave a comment

Horsepower vs. Torque: The age old debate

THE BASICS

So to start with I naturally consulted Google. Most of the top hits for “torque vs. horsepower” are excellent pieces; they break down the math in a very methodical way, so I won’t repeat that excellent work here. Instead I’ll just summarize the basics that are accepted as fact by everyone:

Horsepower:

James Watt came up with the concept of horsepower — which is a measure of, interestingly enough, power. 1 HP is the equivalent of 33,000 ft/lbfs per minute. The reason for the complex unit is that we’re accounting for three things with this number: the amount of weight involved, the distance it’s being moved, and how long it takes to do it (that last one is important).

Torque:

Torque is nothing more than a measurement of twisting, or rotational, force. The easiest way to think of this is to imagine a long shaft — like a car’s axle — and imagine it’s in a room suspended in mid air. Hanging on the bottom of one end is a rope with a weight attached — a very heavy weight.

Now imagine someone trying to, using their hands, twist the shaft so as to lift the weight. Think of them as essentially trying to act like a wench and reel it up. The amount of force they are able to generate to lift the weight in this manner is the torque that they’re able to produce. One unit for measurement of this is the foot-pound. A foot-pound is the rotational ‘force’ generated by hanging a one-pound weight at the end of a 1-foot wrench.

THE COMMON MISTAKE

The mistake most people make when engaging in this debate is considering horsepower and torque independently. Almost everyone argues as if they are separate, unrelated values. They aren’t.

Horsepower = (Torque x RPMs) / 5252
This equation is the second most important thing on this page, and it’s the reason that anyone telling you that horsepower and torque should be considered equally and separately is significantly off-base. The fact of the matter is that horsepower is the product of torque and another value — RPMs (divided by 5252). It’s not unrelated, separate, or different.

In fact, there’s not a single machine in existence that measures a car’s horsepower. It’s a man-made number. When a car’s performance is tested, its torque is measured using a dynamometer. The measure of an engine’s performance is torque. Horsepower is an additional number that’s attained by multiplying the torque by the RPMs.

THE PHYSICS OF ACCELERATION

So now for the most important thing on the page. What determines true acceleration for a vehicle isn’t really debatable — it’s force divided by mass. The formula for acceleration is seen below.

f = ma

Which means…

a = f/m

The confusion only comes in determining which force we’re actually talking about.

So we are solving for acceleration and we have a constant mass. We’ve already established that torque is the amount of rotational force being generated at the engine, but we aren’t concerned with the force at the engine. What we’re interested in is the force at the wheels. The force at the wheels is the f in f = ma (actually, it includes the radius of the wheel as well, but we’re simplifying).

But remember, the transmission ultimately gives the force to the wheels, not the engine. And that’s the trick to this whole mess.

GEARING

So that’s where gearing comes in.

Gearing magnifies torque. The torque at the wheels is the torque at the engine combined with the torque magnification given by the transmission through gearing. So the transmission only sees what’s coming off the engine, while the wheels see the resulting force combination of the engine plus the transmission.

That’s what horsepower represents. Horsepower is the combination of the benefits of the engine’s raw abilities combined with RPMs. And RPMs are what allow us to use gearing effectively, which gives us more torque at the wheels.

CONCLUSION

So a technical answer to the question of, “What makes acceleration: torque or horsepower?”, is torque—but torque at the wheels, not at the engine. And since we’re talking about torque at the wheels and not at the engine, the best answer is horsepower, because horsepower encompasses not only the engine’s torque but the total torque that gets delivered to the wheels and therefore provides the f in f = ma.

Posted on Leave a comment

1:1 Boost Referenced Fuel Pressure Regulators – Why are they important?

Let’s start by identifying the Pressure Reference Port of a fuel pressure regulator. This is the small “air fitting” on the side of the regulator cover. Or with some carbureted regulators, it may be a small hole in the side or rear of the regulator cover. The Pressure Reference Port provides a point of reference for fuel pressure control. With forced induction systems (turbocharging and supercharging), this port is used to receive a “boost reference” to increase fuel pressure under boost conditions. The boost reference originates at the induction system of an engine, and acts upon the diaphragm in the regulator, thereby enabling the regulator to compensate for boost pressure. If the port is not used to maintain constant fuel pressure, such as with normally aspirated engines, then it is vented to the atmosphere. With the atmosphere as a reference, the fuel pressure is constant with atmospheric pressure. In this case it is important to not plug up the pressure reference ports or holes in the regulator, as slight pressure errors can occur.

Regulator Pressure Reference Port with Air Fit 55501 with Vent Filter copy

For boosted EFI applications; the regulator needs to allow additional fuel pressure to overcome resistance created by boost pressure. For example, let’s say a boosted application runs 45 psi of fuel pressure to the injector when under no boost. Let’s say the engine is then put under 20 psi of boost pressure. That means the intake manifold, where the fuel injectors are mounted and spray into, is pressurized by 20 psi. This pressure then “pushes back” fuel in the injector/fuel rail by 20 psi. That means the fuel pressure in the fuel rail must be increased by 20 psi to compensate. So, the 20 psi of boost reference to the Pressure Reference Port causes the regulator to increase fuel pressure in the fuel rail/delivered to the injector from 45 psi to 65 psi – thereby compensating for the 20 psi of resistance created by boost pressure.

However, it should be noted various conditions can affect regulated pressure readings. While Bypass (Return) Style or Blocking (Traditional) Style regulators that use diaphragms are exactly 1:1, in some situations when measurements are taken, it appears less than 1:1. For example, some with Bypass Style regulators have measured their fuel pressure and boost pressure for a blown application and found it to be less than 1:1. For many of these users, they are comparing the operating conditions between idle and full throttle. During full throttle operation, much less fuel is returning back to the fuel tank than during idle operation. When the regulator is returning less fuel, the diaphragm is “more closed” and therefore in a slightly different position, such that the amount of squeeze on the diaphragm spring is less. With less force from the spring, the pressure lowers. The amount of pressure change as a result of how much flow difference is going through the valve is known as the Regulation Slope. Regulation Slope represents the amount of pressure difference (PSI) expected per change in flow rate (GPM). For example, say an engine consumes 1 GPM (60 GPH) at full throttle and the regulator has a Regulation Slope of 3 PSI/GPM, then we can expect that the fuel pressure will lower by 3 PSI at full throttle compared to when measured at idle.

Posted on Leave a comment

Everything you need know about about Fuel Pressure Regulators

    • How to adjust blocking style fuel pressure regulators - FUELAB

      Accurate and consistent fuel pressure is critical for maximum and consistent high performance. Therefore accurate adjustment of fuel pressure is critical. This can prove to be a challenge with Blocking Style fuel pressure regulators: Unless proper adjustment procedure is followed the regulator’s design can cause “pressure creep”, resulting in inconsistent fuel pressure readings during the adjustment process. This article focuses on avoiding pressure creep while adjusting fuel pressure on a Blocking Style Regulator.

      Pressure Creep

      What is pressure creep? To understand, let’s review how Blocking Style Regulators and Bypass Style Regulators function.

      Blocking Style Fuel Pressure Regulator (aka: Traditional Style)

      Below is an example of a Blocking Style Regulator. Please note the cut-away image shows the fuel regulator in the valve closed position.

      Adjusting Carbureted Fuel Pressure Regulators - FUELAB

      Adjusting Carbureted Fuel Pressure Regulators – FUELAB

      With a blocking style regulator, fuel enters through the inlet port (A) and travels past the fuel control valve (B) and then is distributed through an outlet port to the carburetor. In this example, there are two outlet ports (C). Fuel flow and pressure are controlled by the fuel control valve that is actuated by a diaphragm (D). The diaphragm’s movement up and down is limited by a spring (E). Fuel pressure (psi) to the carburetor is set with a threaded adjustment mechanism (F). A vacuum/boost reference port allows the regulator to compensate for boost pressure with forced induction applications (G).

      Blocking style regulators are characterized by a lack of a fuel return line from the regulator back to the fuel tank. When there is no fuel demand from the engine the fuel flow is brought to a halt by the fuel control valve (B). Thus, no fuel is flowing into or out of the regulator.

      Please note, Blocking Style Regulator function is described in greater detail here: http://fuelab.com/fuel-pressure-regulators-low-pressure-applications/

      Bypass Style Fuel Pressure Regulator (aka: Return Style)

      Below is an example of a Bypass Style Regulator. Please note the cut-away image shows the fuel regulator in the valve closed position.

      Adjusting a Blocking Style Fuel Pressure Regulator - FUELAB

      Adjusting a Blocking Style Fuel Pressure Regulator – FUELAB

      With a Bypass Style Regulator, fuel enters through the inlet port (A) and travels past a fuel bypass valve/fuel return line port (which governs fuel flow and pressure) (B) and then is distributed through an outlet port to the carburetor (C). Opening and closing of the bypass valve is limited by a spring (D). Fuel pressure (psi) to the carburetor is set with a threaded adjustment mechanism (E). A vacuum/boost reference port allows the regulator to compensate for boost pressure with forced induction applications (F).

      Bypass Style Regulators are characterized by a fuel return line from the regulator back to the fuel tank. When there is no fuel demand from the engine the fuel continues to flow as it is “rerouted” by the fuel bypass valve (B) away from the engine and to the fuel tank: As opposed to the Blocking Style Regulator which halts fuel flow completely.

      *Please note, Bypass Style Regulator function is described in greater detail here: http://fuelab.com/fuel-pressure-regulators-low-pressure-applications/

      Now, let’s get back to pressure creep. As fuel pressure reaches the maximum value to which a Blocking Style Regulator has been set, the fuel control valve must shut off inlet pressure from getting to the outlet port. This action requires extra force (fuel pressure) to fully shut the valve off and creates a spike in fuel pressure as the valve reaches the closed position. This is often termed “Pressure Creep”. The graph below demonstrates this condition. Of note, Bypass Style Regulators do not experience this problem since fuel never stops flowing.

      Graph

      Pressure creep can cause fuel pressure readings to be inconsistent when taken with the fuel control valve fully closed, and the engine shut off (but with the fuel pump energized). Meaning that the engine can be run and shut off multiple times, and pressure readings taken between each run/shut off cycle can vary. This makes it difficult to accurately and consistently adjust fuel pressure.

      Avoiding Pressure Creep While Adjusting Fuel Pressure with a Blocking Style Regulator

      To properly adjust fuel pressure with a Blocking Style Regulator, pressure creep must be eliminated. This can be achieved by keeping a small amount of fuel flowing through the regulator while making adjustments. The most popular method for doing this is operating the engine at idle speed.

      However, there are times when this method won’t work. Such as when adjustments need to be made with the engine shut off (with the fuel pump energized). Or in the case of nitrous oxide applications that implement an additional regulator, fuel only flows through this regulator when the fuel solenoid is activated under full throttle. So, how can a small amount of flow be provided in these situations? The answer is bleed returns which can be used to simulate flow rate (trickle flow).

      Here are a few ways to set bleed returns:

      Plumb a permanent -3AN fuel return line from the outlet port(s) to the fuel tank

      -3AN line provides sufficient restriction (use of -6AN line would provide too much flow and throw off readings)

      More lines may be plumbed for additional regulators

      If -3AN line is used and is connected to an otherwise unused port, it can be permanently left in place as it is restricted enough not to cause capacity issues. Otherwise, the line(s) can be disconnected when not in use, and the outlet plumbing is reattached to the regulator, and/or the unused outlet port is plugged.

      Or:

      External Flow Source:

      Establish means to quickly hook up a temporary fuel line through which fuel can flow into a fuel safe container outside of the vehicle. This can be done in different ways including:

      A “tee” fitting that can be put place at the gauge port, to which the fuel line is attached

      A specialty adapter fitting that can be placed inline in the outlet plumbing, to which the fuel line is attached

      The fuel line can run through a valve or orifice to provide a restriction to flow small amounts of fuel. Note: Use of a higher flow rate valve may also be used to simulate higher flow rates as well to help judge general capacity.

      Fuel System Bleed Return - FUELAB

      Conclusion

      Properly adjusting fuel pressure is essential for maximum engine performance. Following these methods will help to ensure the most accurate and consistent adjustment of Blocking Style Regulators.

WhatsApp WhatsApp us